Sentilo is an open source software designed by openTrends for the exchange and processing of information from thousands of sensors and actuators, acting as an interface between them and the various applications that want to collect and make use of the information they provide. Thus, it fits well within the Smart City architecture and has the city of Barcelona as the main promoter. But Sentilo is not only made by and for the cities, but also for any organization that wants to implement an IoT application that requires deploying a smaller number of sensors and actuators, such as inside buildings or in the open field.
In this article I will detail how to deploy a Sentilo 1.6 server in a Cloud Computing environment such as Amazon Web Services by creating an EC2 instance from an AMI that will be created by importing an image in Open Virtual Appliance (OVA) format which can be downloaded from Sentilo’s website at https://www.sentilo.io/xwiki/bin/view/Sentilo.Community.Documentation/Use+a+Virtual+Machine.
Since OVA format is open, this procedure can also be followed to import into AWS any other virtual server image that has nothing to do with Sentilo.
Error: Your Requested widget " ai_widget-6" is not in the widget list.
- [do_widget_area above-nav-left]
- [do_widget_area above-nav-right]
- [do_widget_area footer-1]
- [do_widget id="wpp-4"]
- [do_widget_area footer-2]
- [do_widget id="recent-posts-4"]
- [do_widget_area footer-3]
- [do_widget id="recent-comments-3"]
- [do_widget_area footer-4]
- [do_widget id="archives-4"]
- [do_widget_area logo-bar]
- [do_widget id="oxywidgetwpml-3"]
- [do_widget_area menu-bar]
- [do_widget id="search-3"]
- [do_widget_area sidebar]
- [do_widget id="search-4"]
- [do_widget id="ai_widget-2"]
- [do_widget id="categories-5"]
- [do_widget id="ai_widget-3"]
- [do_widget id="ai_widget-4"]
- [do_widget id="ai_widget-5"]
- [do_widget_area sub-footer-1]
- [do_widget id="text-4"]
- [do_widget_area sub-footer-2]
- [do_widget_area sub-footer-3]
- [do_widget_area sub-footer-4]
- [do_widget_area upper-footer-1]
- [do_widget id="search-2"]
- [do_widget id="recent-posts-2"]
- [do_widget id="recent-comments-2"]
- [do_widget id="archives-2"]
- [do_widget id="categories-2"]
- [do_widget id="meta-2"]
- [do_widget_area upper-footer-2]
- [do_widget_area upper-footer-3]
- [do_widget_area upper-footer-4]
- [do_widget_area widgets_for_shortcodes]
- [do_widget id="search-5"]
- [do_widget id="ai_widget-6"]
- [do_widget_area wp_inactive_widgets]
- [do_widget id="wpp-2"]
- [do_widget id="text-1"]
- [do_widget id="recent-posts-3"]
- [do_widget id="categories-3"]
- [do_widget id="archives-3"]
- [do_widget id="icl_lang_sel_widget-3"]
1. Create an S3 bucket and upload the OVA file
In order to import the OVA file it is necessary to first upload it to an existing bucket in Amazon S3 or create a new one specifically for this purpose. Be sure to create it in the same region where you want the new AMI to be generated and be available.

2. Create an IAM role called vmimport
You need an IAM role that allows you to perform some operations such as accessing the image from the S3 bucket created previously. To do this create the following trust-policy.json file on a computer where you have previously installed the AWS CLI command line tool:
{
   "Version": "2012-10-17",
   "Statement": [
      {
         "Effect": "Allow",
         "Principal": { "Service": "vmie.amazonaws.com" },
         "Action": "sts:AssumeRole",
         "Condition": {
            "StringEquals":{
               "sts:Externalid": "vmimport"
            }
         }
      }
   ]
}
Use the next command to add the IAM role to your AWS account:
$ aws iam create-role --role-name vmimport --assume-role-policy-document file:///var/tmp/trust-policy.json
It is important to put the file:// prefix before the complete path to your trust-policy.json file since otherwise you will get a confusing message that will warn of a non-existent syntax error within your JSON:
A client error (MalformedPolicyDocument) occurred when calling the CreateRole operation: This policy contains invalid Json
3. Create file with the necessary IAM policies and assign them to the vmimport role
Create a role-policy.json file with the following content, but setting the name of your own S3 bucket:
{
   "Version": "2012-10-17",
   "Statement": [
      {
         "Effect": "Allow",
         "Action": [
            "s3:ListBucket",
            "s3:GetBucketLocation"
         ],
         "Resource": [
            "arn:aws:s3:::sentilo-test-daniloaz"
         ]
      },
      {
         "Effect": "Allow",
         "Action": [
            "s3:GetObject"
         ],
         "Resource": [
            "arn:aws:s3:::sentilo-test-daniloaz/*"
         ]
      },
      {
         "Effect": "Allow",
         "Action":[
            "ec2:ModifySnapshotAttribute",
            "ec2:CopySnapshot",
            "ec2:RegisterImage",
            "ec2:Describe*"
         ],
         "Resource": "*"
      }
   ]
}
Assign the above policies to your vmimport role with the following command:
$ aws iam put-role-policy --role-name vmimport --policy-name vmimport --policy-document file:///var/tmp/role-policy.json
Error: Your Requested widget " ai_widget-6" is not in the widget list.
- [do_widget_area above-nav-left]
- [do_widget_area above-nav-right]
- [do_widget_area footer-1]
- [do_widget id="wpp-4"]
- [do_widget_area footer-2]
- [do_widget id="recent-posts-4"]
- [do_widget_area footer-3]
- [do_widget id="recent-comments-3"]
- [do_widget_area footer-4]
- [do_widget id="archives-4"]
- [do_widget_area logo-bar]
- [do_widget id="oxywidgetwpml-3"]
- [do_widget_area menu-bar]
- [do_widget id="search-3"]
- [do_widget_area sidebar]
- [do_widget id="search-4"]
- [do_widget id="ai_widget-2"]
- [do_widget id="categories-5"]
- [do_widget id="ai_widget-3"]
- [do_widget id="ai_widget-4"]
- [do_widget id="ai_widget-5"]
- [do_widget_area sub-footer-1]
- [do_widget id="text-4"]
- [do_widget_area sub-footer-2]
- [do_widget_area sub-footer-3]
- [do_widget_area sub-footer-4]
- [do_widget_area upper-footer-1]
- [do_widget id="search-2"]
- [do_widget id="recent-posts-2"]
- [do_widget id="recent-comments-2"]
- [do_widget id="archives-2"]
- [do_widget id="categories-2"]
- [do_widget id="meta-2"]
- [do_widget_area upper-footer-2]
- [do_widget_area upper-footer-3]
- [do_widget_area upper-footer-4]
- [do_widget_area widgets_for_shortcodes]
- [do_widget id="search-5"]
- [do_widget id="ai_widget-6"]
- [do_widget_area wp_inactive_widgets]
- [do_widget id="wpp-2"]
- [do_widget id="text-1"]
- [do_widget id="recent-posts-3"]
- [do_widget id="categories-3"]
- [do_widget id="archives-3"]
- [do_widget id="icl_lang_sel_widget-3"]
4. Create file with the OVA image’s description and generate the AMI
Create a containers.json file with the Sentilo image details, setting again the name of your own S3 bucket:
[
  {
    "Description": "Sentilo OVA",
    "Format": "ova",
    "UserBucket": {
        "S3Bucket": "sentilo-test-daniloaz",
        "S3Key": "Sentilo_160.ova"
    }
}]
Next import the OVA image running the following command:
$ aws ec2 import-image --description "Sentilo" --license-type BYOL --disk-containers file:///var/tmp/containers.json
{
    "StatusMessage": "pending",
    "Description": "Sentilo",
    "Progress": "2",
    "LicenseType": "BYOL",
    "SnapshotDetails": [
        {
            "UserBucket": {
                "S3Bucket": "sentilo-test-daniloaz",
                "S3Key": "Sentilo_160.ova"
            },
            "Format": "OVA",
            "DiskImageSize": 0.0
        }
    ],
    "Status": "active",
    "ImportTaskId": "import-ami-ffi5ogxz"
}
This will launch a task that will take about 15 or 20 minutes to complete in the case of Sentilo, given a 1.4 GB image. You can check its progress with this other command by replacing the task identifier displayed by the previous command and that I have highlighted in bold:
$ aws ec2 describe-import-image-tasks --import-task-ids import-ami-ffi5ogxz
{
    "ImportImageTasks": [
        {
            "StatusMessage": "pending",
            "LicenseType": "BYOL",
            "SnapshotDetails": [
                {
                    "DiskImageSize": 0.0,
                    "Format": "OVA",
                    "UserBucket": {
                        "S3Bucket": "sentilo-test-daniloaz",
                        "S3Key": "Sentilo_160.ova"
                    }
                }
            ],
            "Status": "active",
            "Description": "Sentilo",
            "ImportTaskId": "import-ami-ffi5ogxz",
            "Progress": "2"
        }
    ]
}
The task will remain active with “StatusMessage”: “pending” until it finishes. The “Progress” attribute will indicate the percentage of work made up to that point. The task will be finished when the state changes “completed” and the previous command shows additional information about the already converted image to AMI format:
$ aws ec2 describe-import-image-tasks --import-task-ids import-ami-ffi5ogxz
{
    "ImportImageTasks": [
        {
            "LicenseType": "BYOL",
            "ImportTaskId": "import-ami-ffi5ogxz",
            "SnapshotDetails": [
                {
                    "Format": "VMDK",
                    "UserBucket": {
                        "S3Key": "Sentilo_160.ova",
                        "S3Bucket": "sentilo-test-daniloaz"
                    },
                    "DiskImageSize": 1518814208.0,
                    "SnapshotId": "snap-04b129e4803099b8b",
                    "DeviceName": "/dev/sda1"
                }
            ],
            "Architecture": "x86_64",
            "Status": "completed",
            "ImageId": "ami-d3706fb5",
            "Platform": "Linux",
            "Description": "Sentilo"
        }
    ]
}
From then on you will have a new AMI available in the same region where you created the S3 bucket and it will be ready to launch a new EC2 instance:
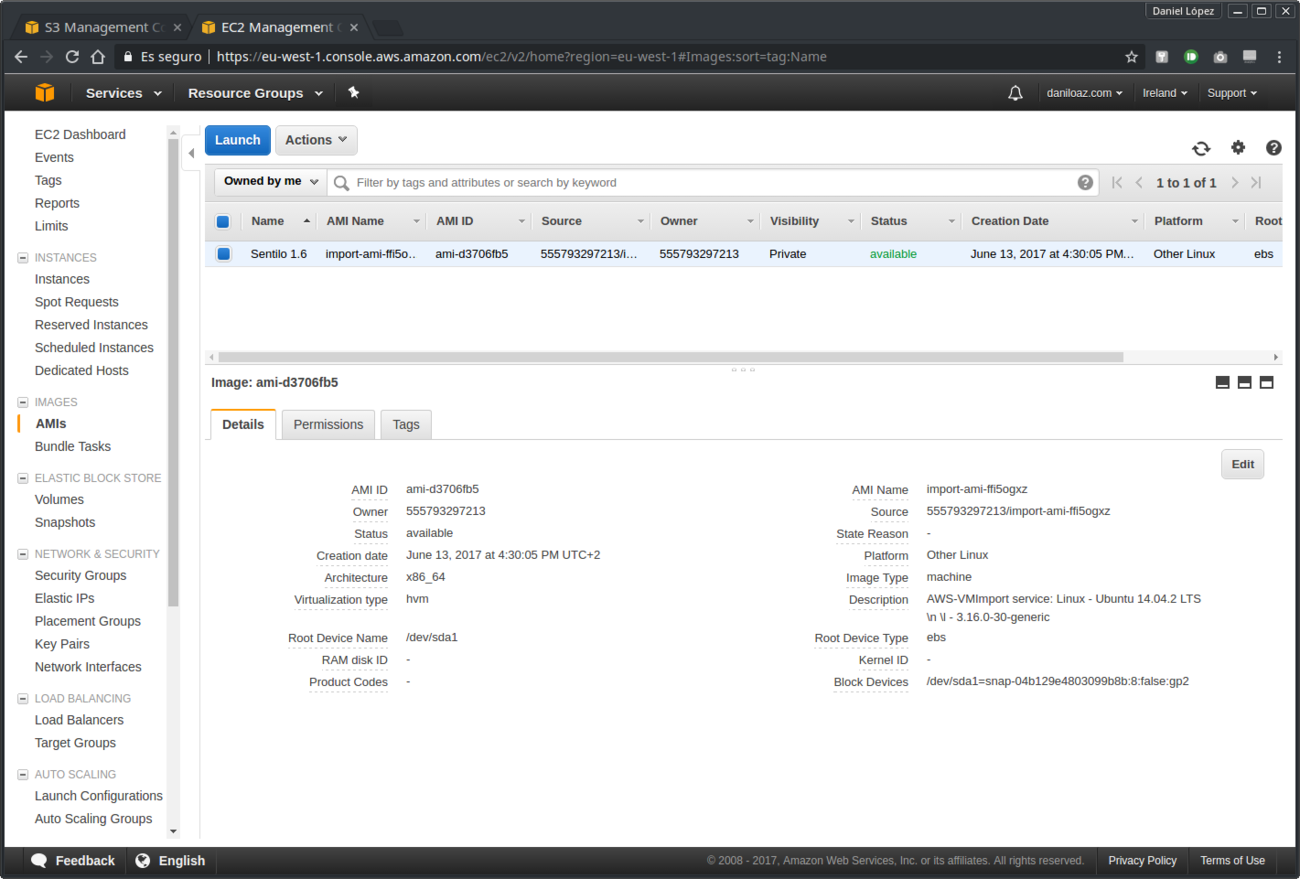
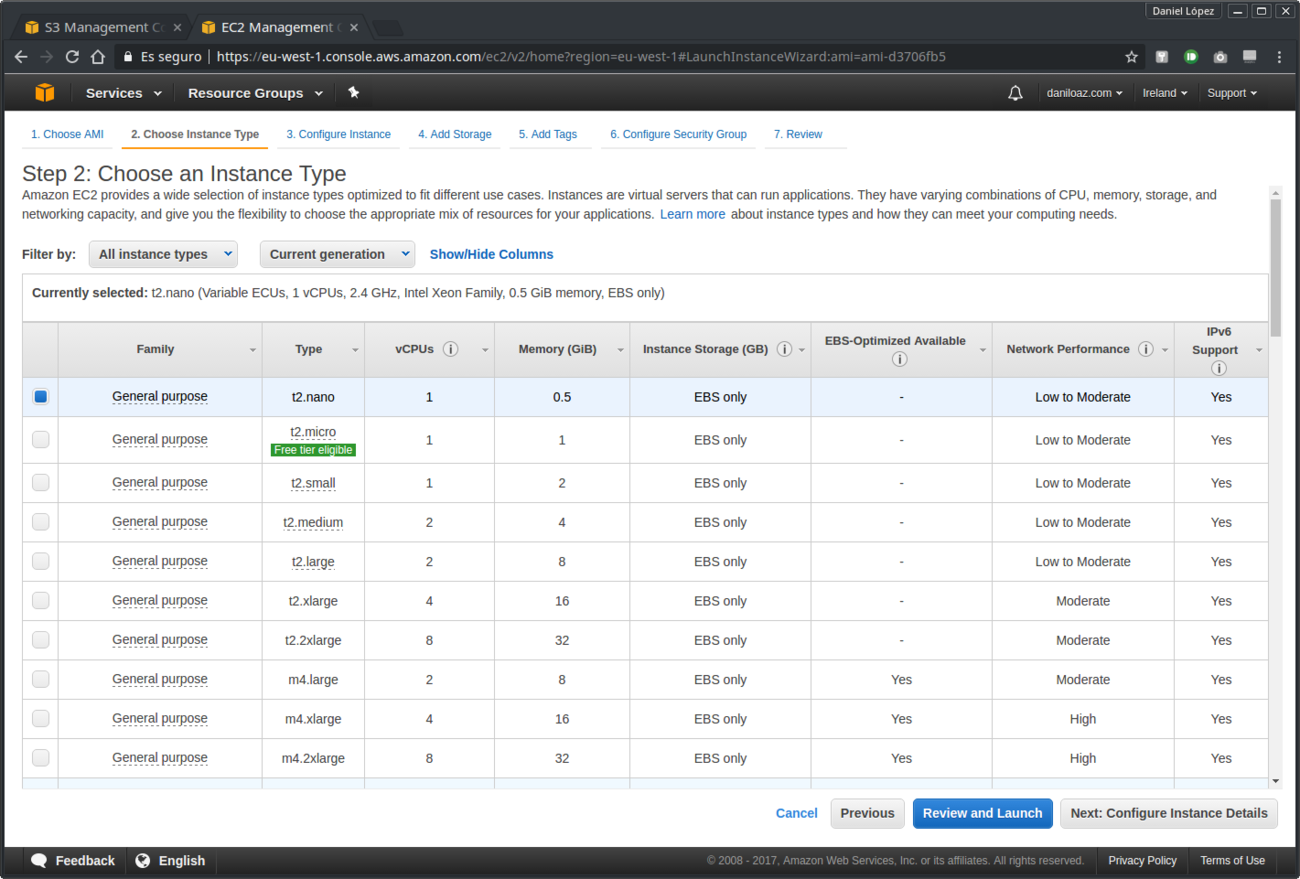
As seen in the previous screenshot, it is possible to launch any type of EC2 instance, even a t2.nano, so you can set up a minimal development/testing environment with very low costs.
5. Access the new Sentilo instance
Finally, once the instance is launched you can easily connect to it through SSH. Please, note that although you were asked for an AWS pair of RSA keys at launching time the Sentilo image is actually ready to be accesed using user and password instead of keys. The access credentials are as follows:
- User: sentilo
- Password: sentilo
To gain root privileges you will use the command “sudo su -” and then enter the same password: sentilo.
$ ssh sentilo@ec2-54-246-129-172.eu-west-1.compute.amazonaws.com
sentilo@ec2-54-246-129-172.eu-west-1.compute.amazonaws.com's password:
Welcome to Ubuntu 14.04.2 LTS (GNU/Linux 3.16.0-30-generic i686)

 * Documentation:  https://help.ubuntu.com/

  System information as of Tue Jun 13 15:43:02 BST 2017

  System load:  0.18              Processes:           84
  Usage of /:   50.0% of 4.51GB   Users logged in:     0
  Memory usage: 68%               IP address for eth0: 172.31.36.204
  Swap usage:   0%

  Graph this data and manage this system at:
    https://landscape.canonical.com/

New release '16.04.2 LTS' available.
Run 'do-release-upgrade' to upgrade to it.

Last login: Tue Jun 13 15:43:03 2017 from 21.red-79-151-30.dynamicip.rima-tde.net
sentilo@sentilo:~$
sentilo@sentilo:~$ sudo su -
[sudo] password for sentilo:
root@sentilo:~#
More information on how to import a virtual machine to an Amazon EC2 AMI here:
https://docs.aws.amazon.com/vm-import/latest/userguide/vmimport-image-import.html
1 comment
Join the conversationVenkat - 08/09/2017
Hello Daniel López
In the Next import the OVA image running the following command: section, there is change that has to be made or else it will through error. The correction is (file:// instead of file:///). I have tried your method but it didn’t work, do look at this link https://github.com/aws/aws-cli/issues/1470#issuecomment-175295424 which explains about file://.
Do update your blog such that it will helpful for others like me. Thanks for sharing your knowledge.