 When we completely fill up an ext4 filesystem mounted on a partition hosted in an EBS volume of Amazon Web Services and we can not do anything to free space because we do not want to lose any of the stored data, the only solution is to grow up the volume and extend the associated partition up to 100% of its capacity to obtain free space again.
Error: Your Requested widget " ai_widget-6" is not in the widget list.
- [do_widget_area above-nav-left]
- [do_widget_area above-nav-right]
- [do_widget_area footer-1]
- [do_widget id="wpp-4"]
- [do_widget_area footer-2]
- [do_widget id="recent-posts-4"]
- [do_widget_area footer-3]
- [do_widget id="recent-comments-3"]
- [do_widget_area footer-4]
- [do_widget id="archives-4"]
- [do_widget_area logo-bar]
- [do_widget id="oxywidgetwpml-3"]
- [do_widget_area menu-bar]
- [do_widget id="search-3"]
- [do_widget_area sidebar]
- [do_widget id="search-4"]
- [do_widget id="ai_widget-2"]
- [do_widget id="categories-5"]
- [do_widget id="ai_widget-3"]
- [do_widget id="ai_widget-4"]
- [do_widget id="ai_widget-5"]
- [do_widget_area sub-footer-1]
- [do_widget id="text-4"]
- [do_widget_area sub-footer-2]
- [do_widget_area sub-footer-3]
- [do_widget_area sub-footer-4]
- [do_widget_area upper-footer-1]
- [do_widget id="search-2"]
- [do_widget id="recent-posts-2"]
- [do_widget id="recent-comments-2"]
- [do_widget id="archives-2"]
- [do_widget id="categories-2"]
- [do_widget id="meta-2"]
- [do_widget_area upper-footer-2]
- [do_widget_area upper-footer-3]
- [do_widget_area upper-footer-4]
- [do_widget_area widgets_for_shortcodes]
- [do_widget id="search-5"]
- [do_widget id="ai_widget-6"]
- [do_widget_area wp_inactive_widgets]
- [do_widget id="wpp-2"]
- [do_widget id="text-1"]
- [do_widget id="recent-posts-3"]
- [do_widget id="categories-3"]
- [do_widget id="archives-3"]
- [do_widget id="icl_lang_sel_widget-3"]
We start in our example with a 50 GB volume full to 100%. We want to extend it to double the size, 100 GB:
~# df -h /var/respaldo
Filesystem      Size  Used Avail Use% Mounted on
/dev/xvdg1       50G   47G     0 100% /var/respaldo
~# lsblk | grep xvdg
xvdg    202:96   0   50G  0 disk
└─xvdg1 202:97   0   50G  0 part
Here are the steps to achieve it:
1. Unmount the filesystem
The first thing to do will be to unmount the filesystem or filesystems present in the EBS volume:
~# sync
~# umount /var/respaldo
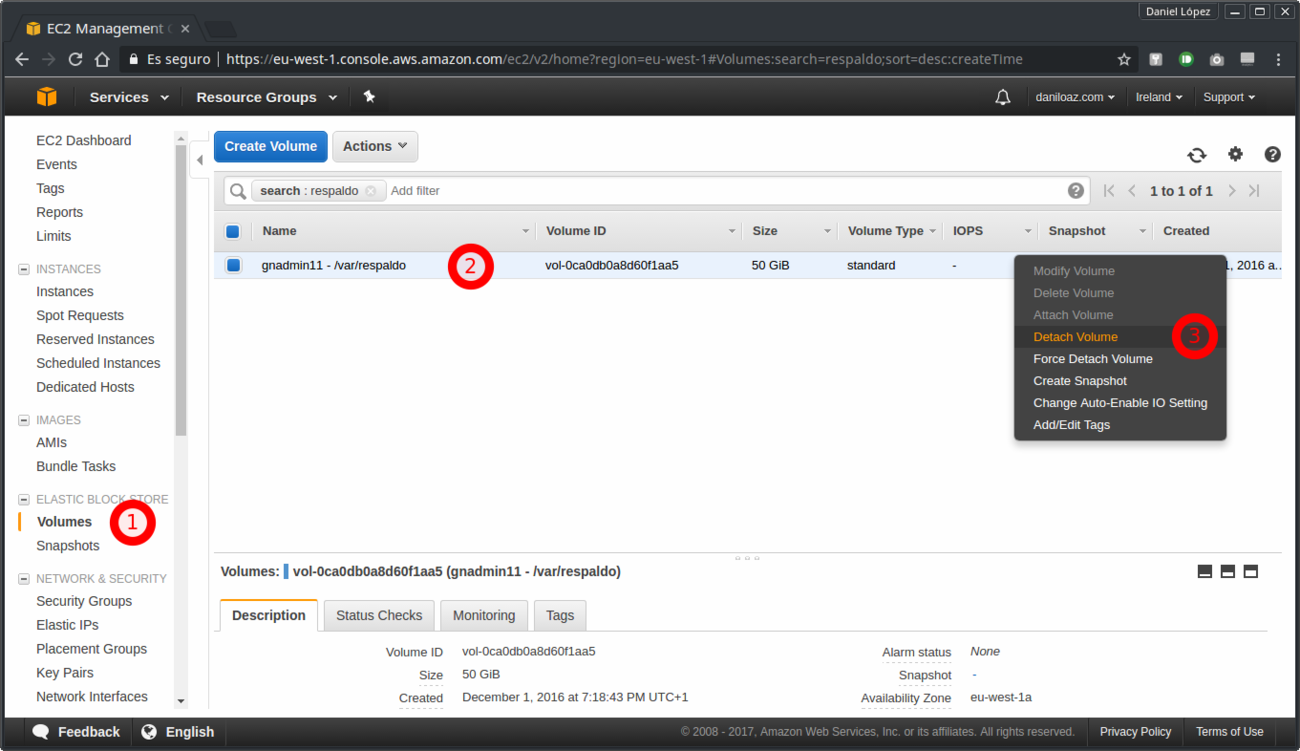
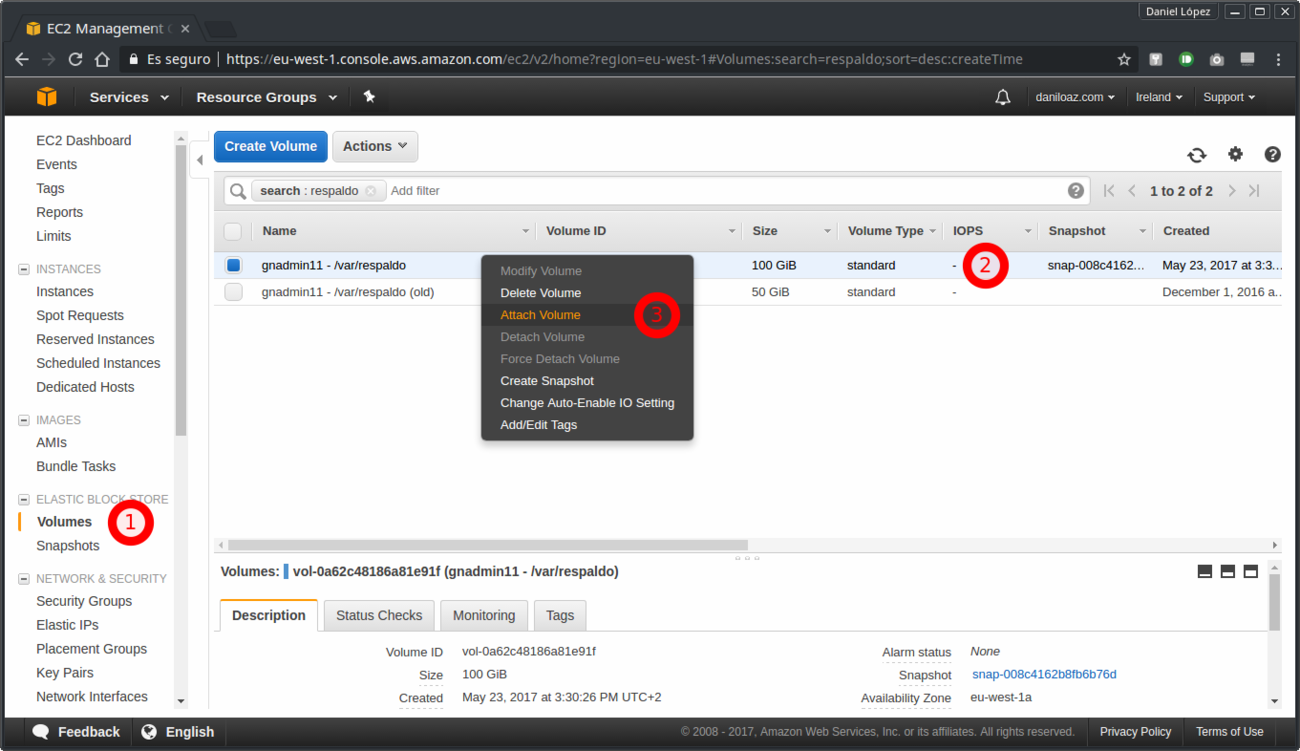
2. Detach the volume from its instance
Next locate in the AWS console the volume and detach it from its EC2 instance:
You can also do the same from the command line (AWS CLI):
~# aws ec2 describe-instances --region eu-west-1 --filters Name=tag-key,Values="Name" Name=tag-value,Values="*gnadmin*" | grep InstanceId
                    "InstanceId": "i-02ed7d0bda0768883",
~# aws ec2 describe-volumes --region eu-west-1 --filters Name=attachment.instance-id,Values=i-02ed7d0bda0768883 --filters Name=tag-key,Values="Name" Name=tag-value,Values="*respaldo*" --query 'Volumes[*].{ID:VolumeId,Tag:Tags}'
[
    {
        "Tag": [
            {
                "Key": "Name",
                "Value": "gnadmin11 - /var/respaldo"
            }
        ],
        "ID": "vol-0ca0db0a8d60f1aa5"
    }
]
~# aws ec2 detach-volume --volume-id vol-0ca0db0a8d60f1aa5
{
    "AttachTime": "2016-12-01T18:19:50.000Z",
    "InstanceId": "i-02ed7d0bda0768883",
    "VolumeId": "vol-0ca0db0a8d60f1aa5",
    "State": "detaching",
    "Device": "/dev/sdg"
}
As you can see, the volume status when you launch the previous command is detaching. You will have to wait until it is available in order to continue with this procedure, but don’t worry, it is almost instantaneous:
~# aws ec2 describe-volumes --region eu-west-1 --volume-id vol-0ca0db0a8d60f1aa5 | grep State
            "State": "available",
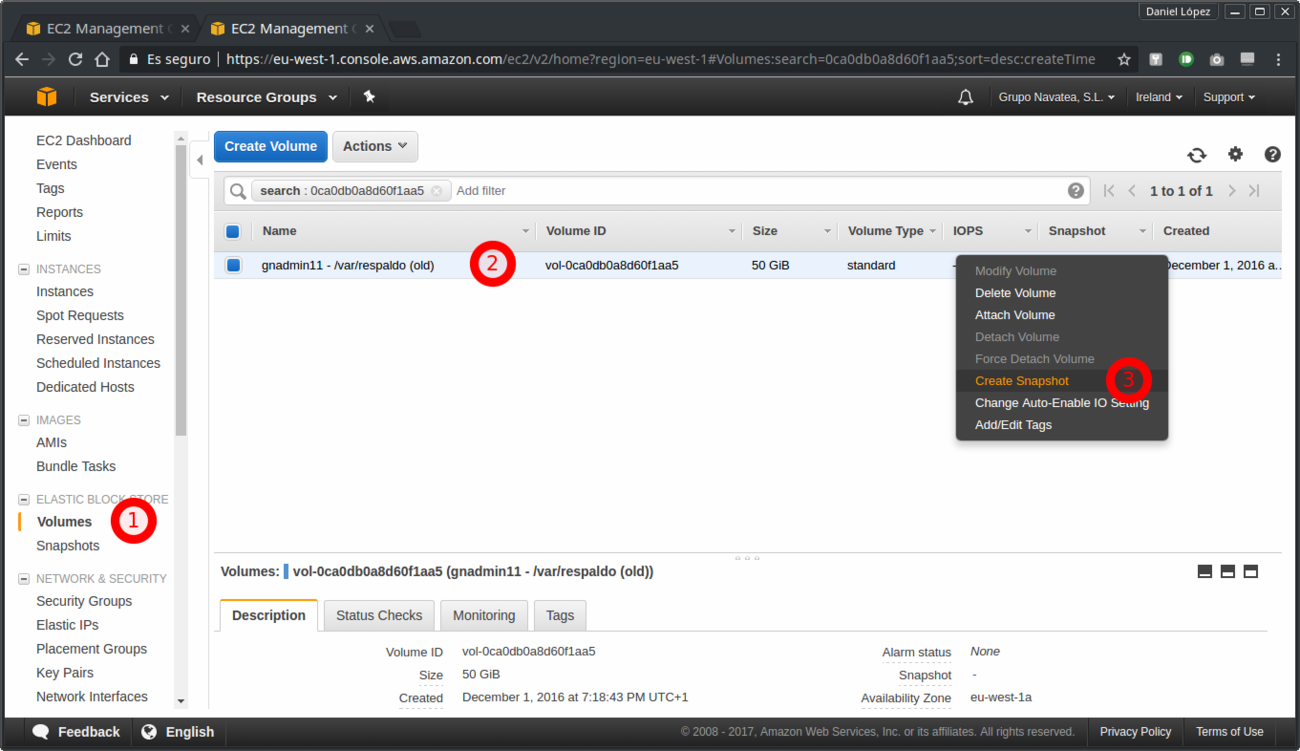
3. Create a volume snapshot
Now you will take a snapshot of your volume and all its contents:
You can get the same result with the aws-cli create-snapshot command:
~# aws ec2 create-snapshot --region eu-west-1 --volume-id vol-0ca0db0a8d60f1aa5 --description "Backup temporal /var/respaldo" | grep SnapshotId
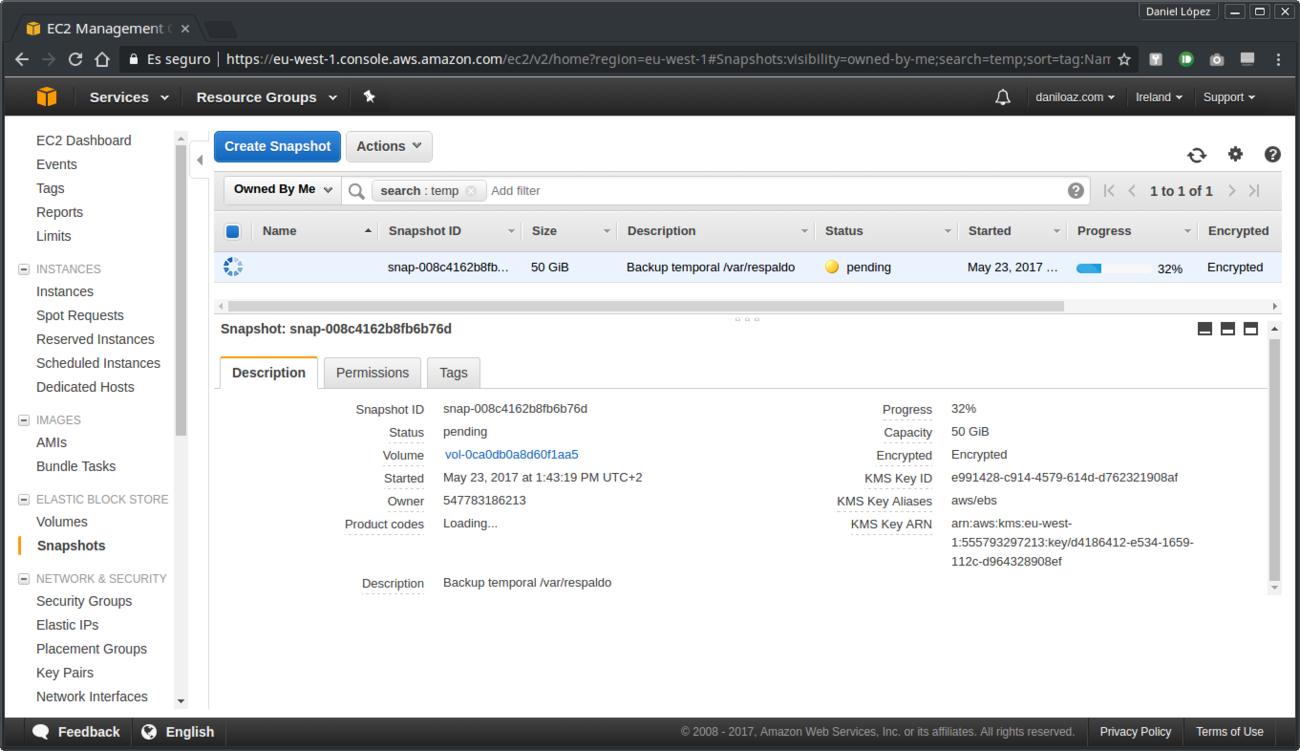
In this case you will have to wait for a long time to finish, especially in large volumes. In the meantime you can check the progress with the following command:
~# aws ec2 describe-snapshots --region eu-west-1 --snapshot-id snap-008c4162b8fb6b76d | egrep "Progress|State"
            "State": "pending",
            "Progress": "27%",
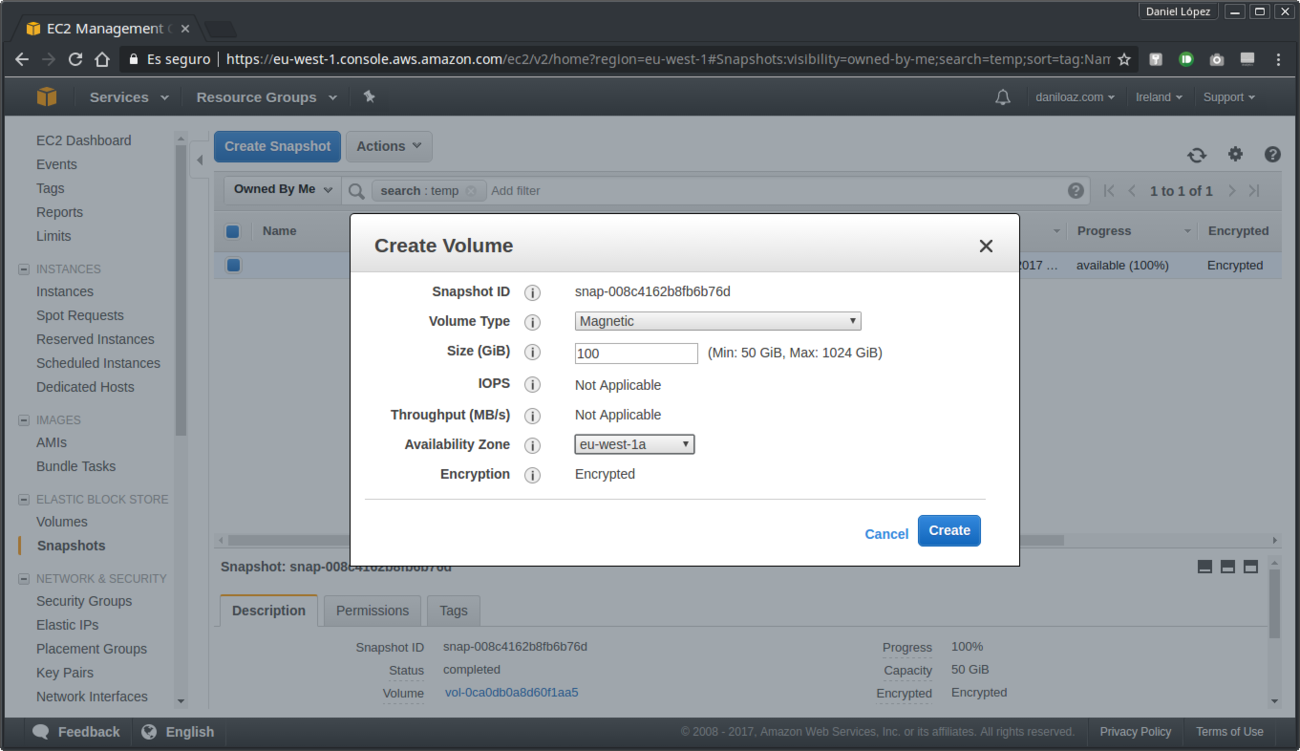
4. Create a new larger volume from the snapshot
As I indicated at the beginning, now you will create a larger volume of 100 GB from the snapshot you took in the previous section. The volume type in the example is magnetic, but you can select the type that best suits your needs:

To do the same from the command line you will execute the following:
~# aws ec2 create-volume --size 100 --region eu-west-1 --availability-zone eu-west-1a --snapshot-id snap-008c4162b8fb6b76d --volume-type standard
{
    "Size": 100,
    "SnapshotId": "snap-008c4162b8fb6b76d",
    "Encrypted": true,
    "VolumeType": "standard",
    "AvailabilityZone": "eu-west-1a",
    "VolumeId": "vol-0b87a40a0ff017f69",
    "CreateTime": "2017-05-23T14:01:25.890Z",
    "State": "creating"
}
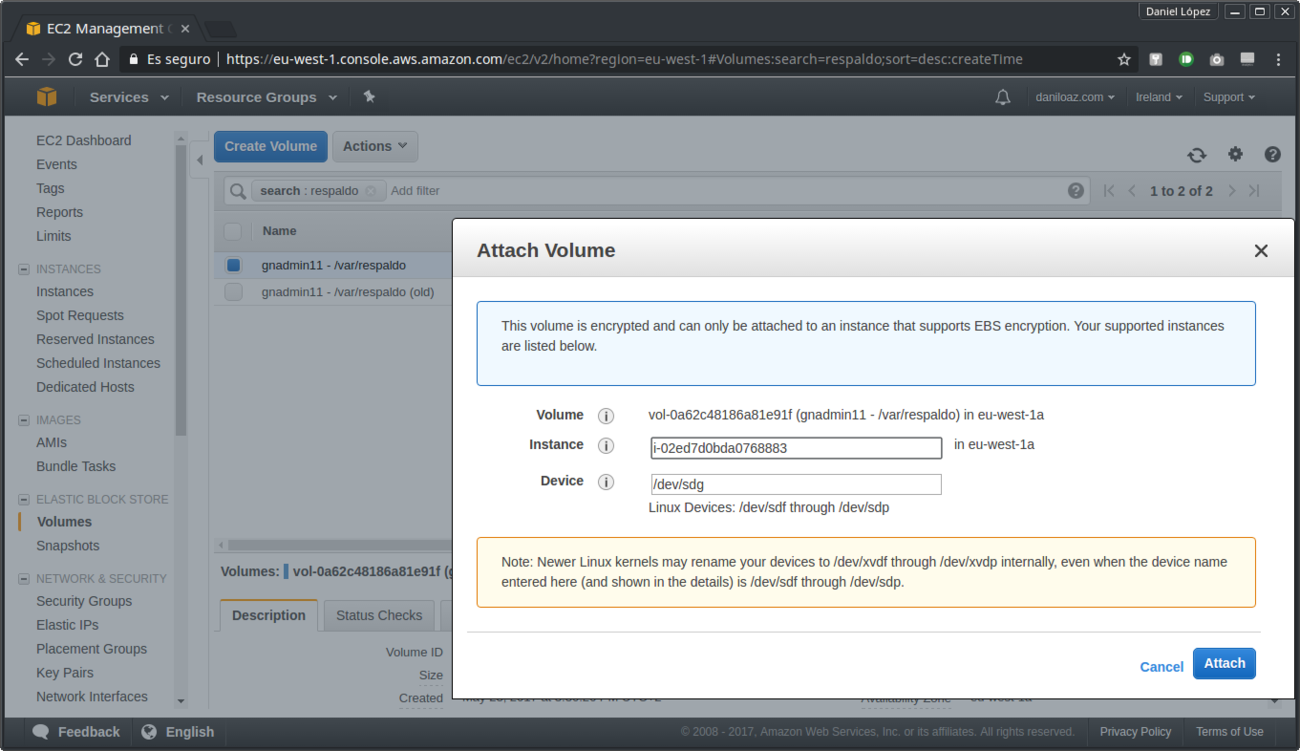
5. Attach the new volume to your instance
Once the volume is created and becomes available, you can attach it again to your instance from the AWS console:
Or from the command line:
~# aws ec2 attach-volume --volume-id vol-0b87a40a0ff017f69 --instance-id i-02ed7d0bda0768883 --device /dev/sdg
{
    "VolumeId": "vol-0b87a40a0ff017f69",
    "InstanceId": "i-02ed7d0bda0768883",
    "Device": "/dev/sdg",
    "AttachTime": "2017-05-23T14:35:26.200Z",
    "State": "attaching"
}
Error: Your Requested widget " ai_widget-6" is not in the widget list.
- [do_widget_area above-nav-left]
- [do_widget_area above-nav-right]
- [do_widget_area footer-1]
- [do_widget id="wpp-4"]
- [do_widget_area footer-2]
- [do_widget id="recent-posts-4"]
- [do_widget_area footer-3]
- [do_widget id="recent-comments-3"]
- [do_widget_area footer-4]
- [do_widget id="archives-4"]
- [do_widget_area logo-bar]
- [do_widget id="oxywidgetwpml-3"]
- [do_widget_area menu-bar]
- [do_widget id="search-3"]
- [do_widget_area sidebar]
- [do_widget id="search-4"]
- [do_widget id="ai_widget-2"]
- [do_widget id="categories-5"]
- [do_widget id="ai_widget-3"]
- [do_widget id="ai_widget-4"]
- [do_widget id="ai_widget-5"]
- [do_widget_area sub-footer-1]
- [do_widget id="text-4"]
- [do_widget_area sub-footer-2]
- [do_widget_area sub-footer-3]
- [do_widget_area sub-footer-4]
- [do_widget_area upper-footer-1]
- [do_widget id="search-2"]
- [do_widget id="recent-posts-2"]
- [do_widget id="recent-comments-2"]
- [do_widget id="archives-2"]
- [do_widget id="categories-2"]
- [do_widget id="meta-2"]
- [do_widget_area upper-footer-2]
- [do_widget_area upper-footer-3]
- [do_widget_area upper-footer-4]
- [do_widget_area widgets_for_shortcodes]
- [do_widget id="search-5"]
- [do_widget id="ai_widget-6"]
- [do_widget_area wp_inactive_widgets]
- [do_widget id="wpp-2"]
- [do_widget id="text-1"]
- [do_widget id="recent-posts-3"]
- [do_widget id="categories-3"]
- [do_widget id="archives-3"]
- [do_widget id="icl_lang_sel_widget-3"]
6. Extend partition to grow it up to 100% of available space
After attaching the volume to its instance, you can now see the volume has a size of 100GB with the lsblk command, but the partition is still 50GB:
~# lsblk | grep xvdg
xvdg    202:96   0  100G  0 disk
└─xvdg1 202:97   0   50G  0 part
So now it is necessary to extend it to increase its size to 100 GB so that 100% of the available space is used and not wasted. It may be necessary to unmount the file system again, since the operating system automatically mount it after attaching the volume to the instance if it finds the partition necessary information in the /etc/fstab file:
~# umount /var/respaldo
~# parted /dev/xvdg resizepart 1 100%
Warning: Not all of the space available to /dev/xvdg appears to be used, you can fix the GPT to use all of the space (an extra 104857600 blocks) or continue with the current setting?
Fix/Ignore? Fix
Information: You may need to update /etc/fstab.
~# lsblk | grep xvdg
xvdg    202:96   0  100G  0 disk
└─xvdg1 202:97   0  100G  0 part /var/respaldo
7. Resize the ext4 filesystem to 100% of the partition
In the same way that it was necessary to resize the partition so that it occupies 100% of the volume, now it is necessary to do the same with the filesystem with which the partition is formatted, ext4 in our example. You can do this using the resize2fs command:
~# resize2fs /dev/xvdg1
resize2fs 1.42.13 (17-May-2015)
Filesystem at /dev/xvdg1 is mounted on /var/respaldo; on-line resizing required
old_desc_blocks = 4, new_desc_blocks = 7
The filesystem on /dev/xvdg1 is now 26214139 (4k) blocks long.
8. Optionally check filesystem’s integrity
Although the resizing performed by the resize2fs command is very secure and data corruption is unlikely to occur, it is a good idea to perform a complete filesystem check before you start using it again. Previously it may be necessary to unmount it, since it will probably be automatically mounted after resize2fs command finishes:
~# fsck.ext4 -f /dev/xvdg1
e2fsck 1.42.13 (17-May-2015)
Pass 1: Checking inodes, blocks, and sizes
Pass 2: Checking directory structure
Pass 3: Checking directory connectivity
Pass 4: Checking reference counts
Pass 5: Checking group summary information
/dev/xvdg1: 610218/6553600 files (0.2% non-contiguous), 12654908/26214139 blocks
9. Mount the filesystem
Finally you will mount the filesystem and you will be able to see how now its occupation has fallen to 50% and you have almost 50 GB of additional space available, which was the initial goal:
~# mount /dev/xvdg1
~# df -h /dev/xvdg1
Filesystem      Size  Used Avail Use% Mounted on
/dev/xvdg1       99G   47G   48G  50% /var/respaldo
2 comments
Join the conversationUltimate - 15/09/2020
Huh. This sounds way too complicated.. Is there no other way 🙁
Daniel - 14/10/2020
Yes, some time ago Amazon added feature to modify EBS volume size, so you can increase it to the desired size, and then run the growpart and resize2fs commands to resize partition and filesystem respectively with 0 downtime.