In my 5 ways to exclude your own visits from Google Analytics post I discussed the 5 main methods that exist to prevent visits you make to your own websites are tracked by Google Analytics, each with its pros and cons. However, I found it necessary to further expand the first of those methods, which in my opinion is the best possible way to exclude your own internal traffic from Google Analytics based on your IP address, whether fixed or dynamic. It allows you not only to block yourself but also filter the activity of all members on your own team or company, which is of utmost importance to avoid any interference with data collected from real user activity.
And I say Google Analytics because it is the main actor in this market, but this same method is perfectly suitable for any other web analytics tool like Piwik, Clicky, OWA, Clicktale, StatCounter, Kissmetrics, Mouseflow and many others.
It’s not possible to track a session if the tracking code doesn’t exist
We start out from the basic assumption that if the tracking code doesn’t exist, then it is not necessary to apply any exclusion rule, filter or any other mechanism intended to block ourselves from Google Analytics so that it doesn’t be aware of our own activity, which indeed will usually has nothing to do with that of real users.
Thus, if you manage to control at will if Google Analytics tracking code is appended or not to the HTML page returned by your website, then you will not find a more secure and reliable way to prevent your own activity and interactions from being tracked and your statistics from being altered, not only the most common number of sessions and unique visitors but also other very important ones such as pages per visit, bounce rate, average time on site, etc.
Error: Your Requested widget " ai_widget-6" is not in the widget list.
- [do_widget_area above-nav-left]
- [do_widget_area above-nav-right]
- [do_widget_area footer-1]
- [do_widget id="wpp-4"]
- [do_widget_area footer-2]
- [do_widget id="recent-posts-4"]
- [do_widget_area footer-3]
- [do_widget id="recent-comments-3"]
- [do_widget_area footer-4]
- [do_widget id="archives-4"]
- [do_widget_area logo-bar]
- [do_widget id="oxywidgetwpml-3"]
- [do_widget_area menu-bar]
- [do_widget id="search-3"]
- [do_widget_area sidebar]
- [do_widget id="search-4"]
- [do_widget id="ai_widget-2"]
- [do_widget id="categories-5"]
- [do_widget id="ai_widget-3"]
- [do_widget id="ai_widget-4"]
- [do_widget id="ai_widget-5"]
- [do_widget_area sub-footer-1]
- [do_widget id="text-4"]
- [do_widget_area sub-footer-2]
- [do_widget_area sub-footer-3]
- [do_widget_area sub-footer-4]
- [do_widget_area upper-footer-1]
- [do_widget id="search-2"]
- [do_widget id="recent-posts-2"]
- [do_widget id="recent-comments-2"]
- [do_widget id="archives-2"]
- [do_widget id="categories-2"]
- [do_widget id="meta-2"]
- [do_widget_area upper-footer-2]
- [do_widget_area upper-footer-3]
- [do_widget_area upper-footer-4]
- [do_widget_area widgets_for_shortcodes]
- [do_widget id="search-5"]
- [do_widget id="ai_widget-6"]
- [do_widget_area wp_inactive_widgets]
- [do_widget id="wpp-2"]
- [do_widget id="text-1"]
- [do_widget id="recent-posts-3"]
- [do_widget id="categories-3"]
- [do_widget id="archives-3"]
- [do_widget id="icl_lang_sel_widget-3"]
Thus, the point is to make a small change on the server side so that your application’s code analyzes user’s origin in order to distinguish you among the bunch of users that can access your site before returning the requested page. And the best way to make that distinction is to rely on the source IP addresses of server established connections.
Excluding your IP from Google Analytics
Here is a small sample script in PHP that has been successfully tested on WordPress, but which also can be integrated into any other CMS such as Drupal, Joomla or any other PHP framework or standalone application. In fact, I have not created it as a WordPress plugin precisely so that you can appreciate its simplicity and it can be easily ported to any other application or even to any other programming language.
It consists of a single check-user-ip.php file that will be placed into the DocumentRoot of your WordPress installation and that has the following content:
<?php

$isMyOwnIp = false;
$ownIpAddresses = "37.11.156.11;37.11.168.194;81.52.64.111;37.12.156.43";

if ($ownIpAddresses) {
    // Try to obtain user's public IP address in several ways in order to
    // be compatible with different web servers and different versions
    if ($_SERVER) {
        if ( $_SERVER[HTTP_X_FORWARDED_FOR] ) {
            preg_match_all ('/\d+\.\d+\.\d+\.\d+/', $_SERVER[HTTP_X_FORWARDED_FOR], $ipArray);
        } else if ( $_SERVER["HTTP_CLIENT_IP"] ) {
            preg_match_all ('/\d+\.\d+\.\d+\.\d+/', $_SERVER["HTTP_CLIENT_IP"], $ipArray);
        } else {
            preg_match_all ('/\d+\.\d+\.\d+\.\d+/', $_SERVER["REMOTE_ADDR"], $ipArray);
        }
    } else {
        if ( getenv( "HTTP_X_FORWARDED_FOR" ) ) {
            preg_match_all ('/\d+\.\d+\.\d+\.\d+/', getenv( "HTTP_X_FORWARDED_FOR" ), $ipArray);
        } elseif ( getenv( "HTTP_CLIENT_IP" ) ) {
            preg_match_all ('/\d+\.\d+\.\d+\.\d+/', getenv( "HTTP_CLIENT_IP" ), $ipArray);
        } else {
            preg_match_all ('/\d+\.\d+\.\d+\.\d+/', getenv( "REMOTE_ADDR" ), $ipArray);
        }
    }

    // Check if user's public IP matches any of those in the exclusion list
    foreach ($ipArray[0] as $userIp) {
        if (strpos($ownIpAddresses, $userIp) !== false) {
            $isMyOwnIp = true;
        }
    }
}
The above script simply checks whether user’s public IP matches any address in the exclusion list, which consists of a string of IP addresses separated by a semicolon (;). If so, the value of $isMyOwnIp variable will change to true, instead of the default, which is false.
Now you only have to include this script into the footer of your WordPress theme or any other template/file within your application where the </body> closing tag is rendered, since it is there where most web analytics applications, including Google Analytics, will usually demand their tracking code to be placed at. In my example I just added the include code to the wp-content/themes/lambda-child/footer.php file (lines 128 and 129) as I’m currently using Lambda theme from Oxygenna:
126         <?php $google_anal = oxy_get_option( 'google_anal' ); ?>
127         <?php if( !empty( $google_anal ) ) : ?>
128             <?php include ('check-user-ip.php'); ?>
129             <?php if (!$isMyOwnIp) echo oxy_get_option( 'google_anal' ); ?>
130             <?php //echo oxy_get_option( 'google_anal' ); ?>
131         <?php endif; ?>
And that’s all. From now on, any time you visit your own website from any of the IP addresses in the exclusion list that session will not become part of your Google Analytics statistics anymore. The best thing is that this will be so regardless of the device you choose to access your site, whether a desktop computer, tablet, mobile phone, Smart TV or even your Play Station. And all without having to do anything else, nor remember to install cookies, nor configure any filter in Google Analytics control panel, nor install browser extensions, nor anything at all.
Error: Your Requested widget " ai_widget-6" is not in the widget list.
- [do_widget_area above-nav-left]
- [do_widget_area above-nav-right]
- [do_widget_area footer-1]
- [do_widget id="wpp-4"]
- [do_widget_area footer-2]
- [do_widget id="recent-posts-4"]
- [do_widget_area footer-3]
- [do_widget id="recent-comments-3"]
- [do_widget_area footer-4]
- [do_widget id="archives-4"]
- [do_widget_area logo-bar]
- [do_widget id="oxywidgetwpml-3"]
- [do_widget_area menu-bar]
- [do_widget id="search-3"]
- [do_widget_area sidebar]
- [do_widget id="search-4"]
- [do_widget id="ai_widget-2"]
- [do_widget id="categories-5"]
- [do_widget id="ai_widget-3"]
- [do_widget id="ai_widget-4"]
- [do_widget id="ai_widget-5"]
- [do_widget_area sub-footer-1]
- [do_widget id="text-4"]
- [do_widget_area sub-footer-2]
- [do_widget_area sub-footer-3]
- [do_widget_area sub-footer-4]
- [do_widget_area upper-footer-1]
- [do_widget id="search-2"]
- [do_widget id="recent-posts-2"]
- [do_widget id="recent-comments-2"]
- [do_widget id="archives-2"]
- [do_widget id="categories-2"]
- [do_widget id="meta-2"]
- [do_widget_area upper-footer-2]
- [do_widget_area upper-footer-3]
- [do_widget_area upper-footer-4]
- [do_widget_area widgets_for_shortcodes]
- [do_widget id="search-5"]
- [do_widget id="ai_widget-6"]
- [do_widget_area wp_inactive_widgets]
- [do_widget id="wpp-2"]
- [do_widget id="text-1"]
- [do_widget id="recent-posts-3"]
- [do_widget id="categories-3"]
- [do_widget id="archives-3"]
- [do_widget id="icl_lang_sel_widget-3"]
One moment, what if my public IP address is dynamic?
If your Internet connection has a dynamic IP address it would be quite tedious having to constantly update the exclusion list every time the IP changes, which happens unannounced and out of the blue. In fact, it would probably not even be tedious because you would directly discard this method and look for another better alternative. But if you continue reading you will discover that with some additional enhancements this method is also suitable for you even if you are a digital nomad and your IP changes incessantly.
Using a dynamic DNS client from your smartphone which points to none DDNS server
Today your smartphone is a great company which goes with you everywhere. You will probably connect it to every wifi you use to work with your laptop, whether your office, your home or an Internet cafe. Otherwise, if don’t want to use a public wifi connection, which on the other hand is most recommended, you will prefer to leverage your own mobile Internet access to connect other devices like your tablet or laptop through your cellular. In either case your public IP address will be perfectly known by your cell phone, so if you can get it to automatically add that IP to the exclusion list every time it changes, you will have solved the problem.
This is where a very simple app that you will install on your smartphone comes into play: a DDNS or dynamic DNS client. Typically you use a DDNS client to connect to a DDNS server offered by a given provider like Dyn.com or NoIP.com, which are usually paid services if you want to use your own domain names. In any case, there is no need to use a DDNS service to achieve our goal since obtaining your public IP address is enough. It is not necessary to map it to a name, so you can absolutely skip that step. Therefore you just need to install a free app like Dynamic DNS Update on your Android and you are ready.
This is so because DDNS clients communicate IP updates by making HTTP calls to the DDNS server with some parameters, including the new IP address that changed. Thus, instead of performing the usual task of updating domain names, we will capture those HTTP calls directly on the web server in order to extract the IP address that changed and automatically add it to the exclusion list. No DNS involved in the whole process.
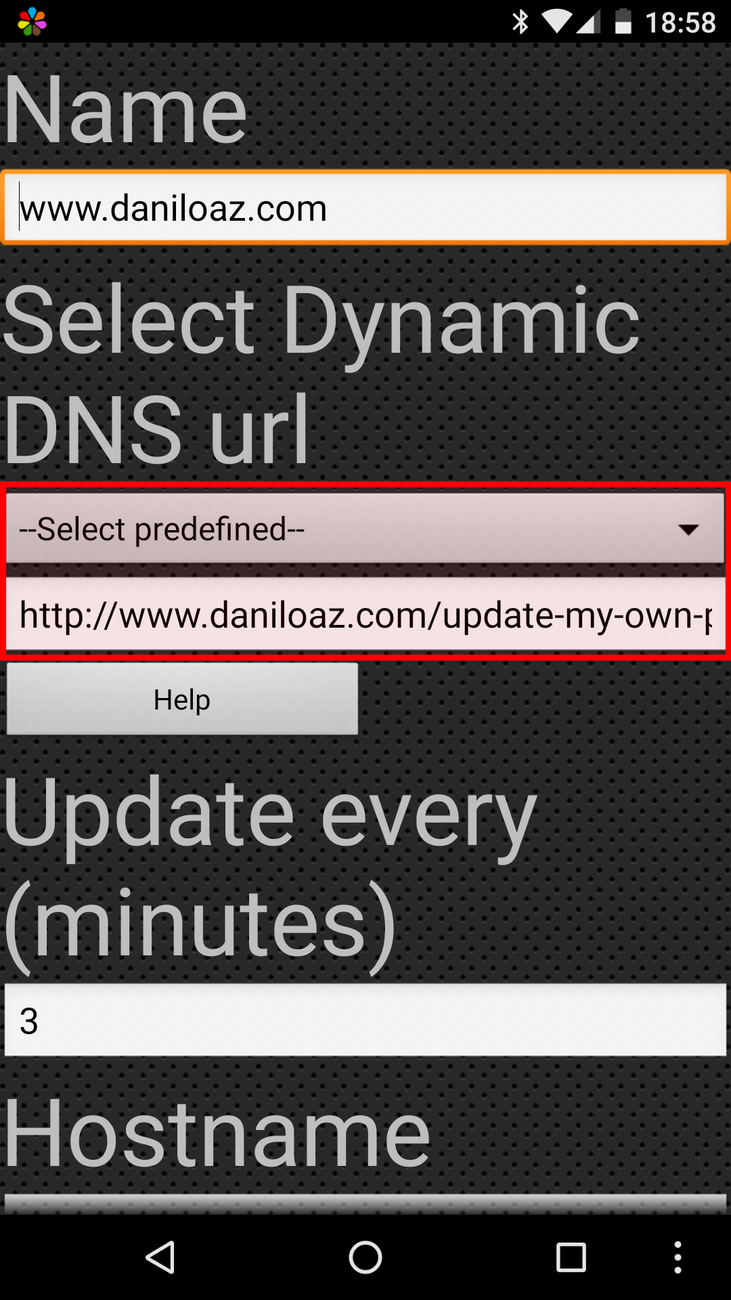
To do this, it is necessary the dynamic DNS client app allows to select a custom DDNS provider that is not one in the usual list of providers of this kind of service. That is, it must let you enter a custom update URL manually. The Dynamic DNS Update app in my example allows this to be done, so it is perfectly suitable for this mission.
Configuring the Dynamic DNS Update app
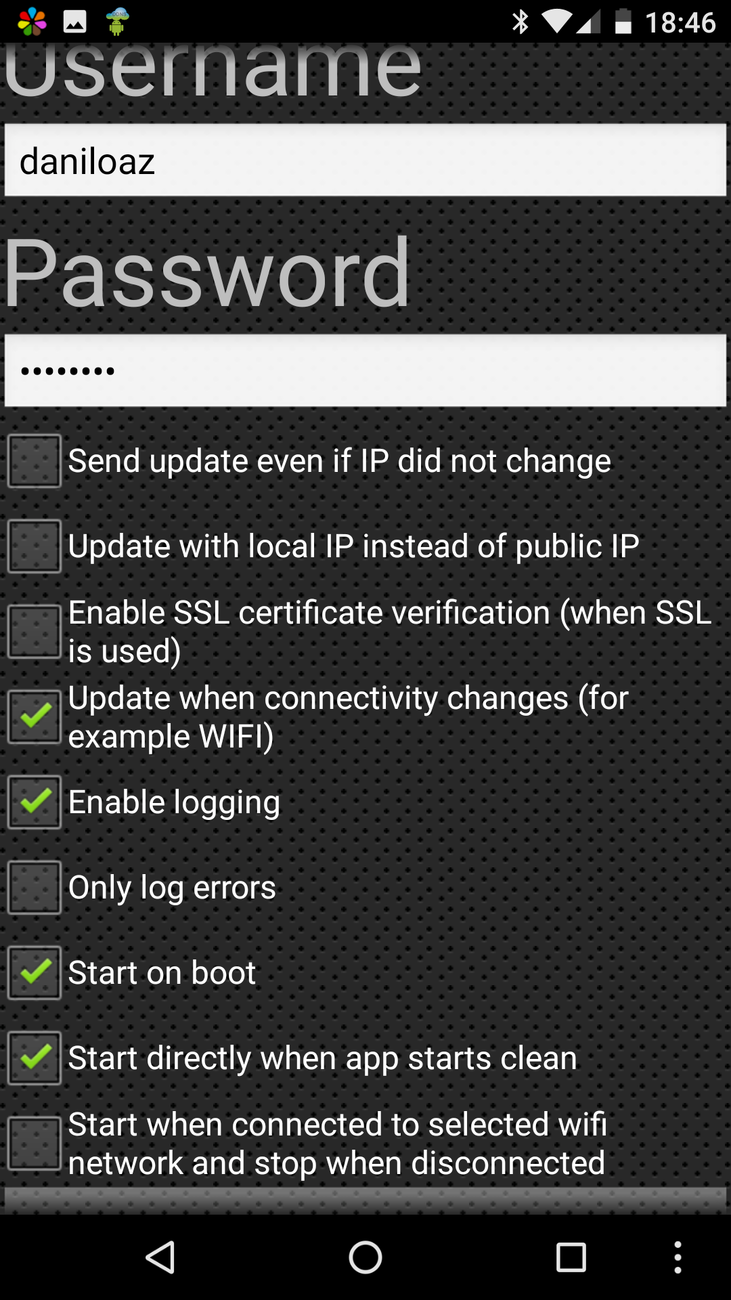
Basically you will have to add a new updater for your website that will consist of a custom update URL and access credentials so that only you can perform IP updates on the exclusion list from your mobile phone.
The update URL will look like this:
https://www.daniloaz.com/update-my-own-public-ip.php?hostname=%hostname%&username=%username%&password=%password%&ip=%ip%
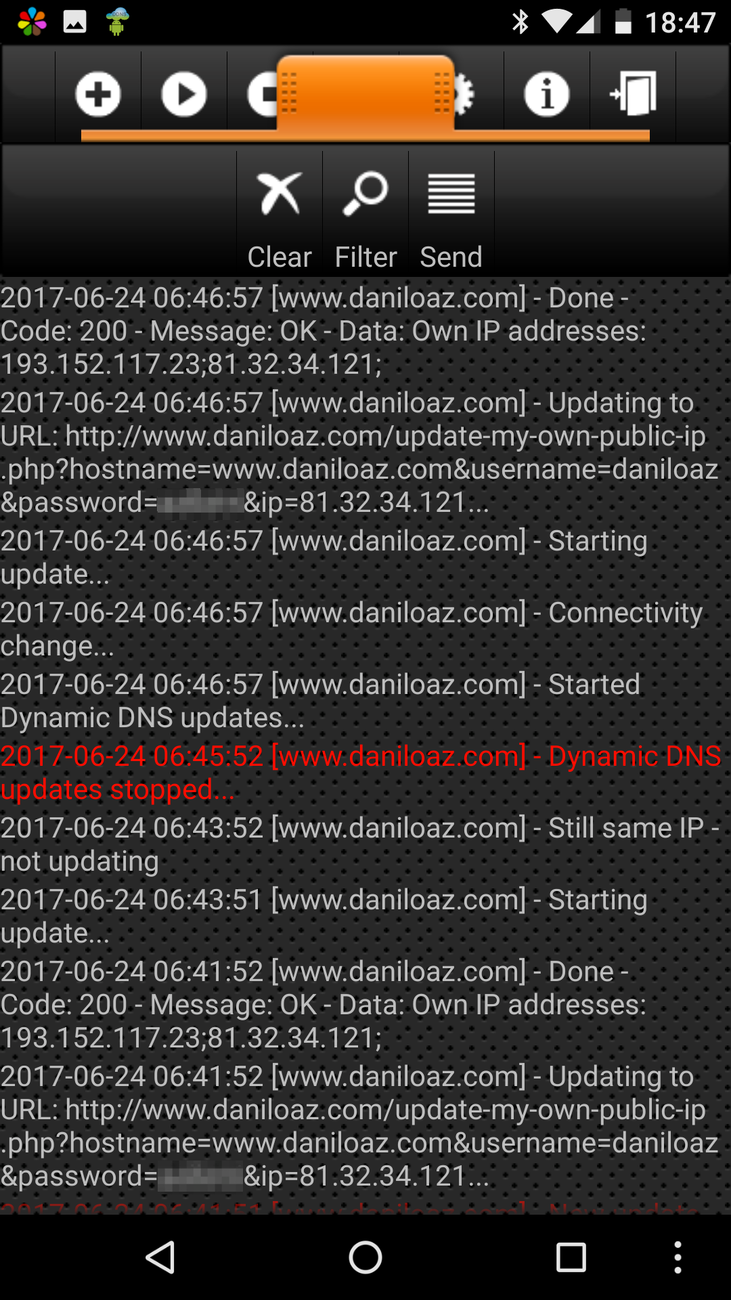
The rest of app’s configuration parameters are shown in the following screenshots:
Configuration on the server side
Once the DDNS client is configured, it only remains to capture HTTP update requests on your web server. To do this you will add to the DocumentRoot of your WordPress installation the following update-my-own-public-ip.php script that extracts the necessary information and updates the exclusion list:
<?php

$newIpAddresses     = array();
$ipAddressesToStore = 5;
$ownIpAddressesFile = 'own-ip-addresses.lst';
$currentIpAddresses = file_get_contents($ownIpAddressesFile, false);
$myUsername         = 'daniloaz';
$myPassword         = 'test';
$myHostname         = 'www.daniloaz.com';

// Extract variables from request and sanitize them for security
$username = filter_var($_REQUEST['username'], FILTER_SANITIZE_STRING);
$password = filter_var($_REQUEST['password'], FILTER_SANITIZE_STRING);
$hostname = filter_var($_REQUEST['hostname'], FILTER_SANITIZE_STRING);
$newIp    = filter_var($_REQUEST['ip'], FILTER_SANITIZE_STRING);

// Security check before making any update
if ($username != $myUsername or $password != $myPassword or $hostname != $myHostname) {
    echo "<h1>Forbidden</h1>";
    header("HTTP/1.0 403 Forbidden");
    die();
}

// If the new IP is not already in the exclusion list, update the file
if (strpos($currentIpAddresses, $newIp) === false) {
    $currentIpAddresses = explode (';', $currentIpAddresses);
    // Keep the $ipAddressesToStore most recent addresses
    array_unshift($currentIpAddresses, $newIp);
    for($i=0;$i<$ipAddressesToStore;$i++) {
        if ($currentIpAddresses[$i]) {
            $newIpAddresses[] = $currentIpAddresses[$i];
        }
    }
    // Update the file
    $newIpAddresses = implode(';', $newIpAddresses);
    file_put_contents($ownIpAddressesFile, $newIpAddresses);
    // Notify change by email
    mail('daniloaz@gmail.com', 'Own public IP address updated', file_get_contents($ownIpAddressesFile, false));
}

echo 'Own IP addresses: ' . file_get_contents($ownIpAddressesFile, false);
As you can see in the code above, the list of IP addresses that should not be tracked by Google Analytics is kept in a separate file (own-ip-addresses.lst). Therefore, it will be necessary to modify line 4 of the check-user-ip.php script that I showed you at the beginning of this post when dealing with fixed IP addresses:
$ownIpAddresses = file_get_contents('own-ip-addresses.lst', false);
The $ownIpAddresses varable will contain in this case a list of IP addresses and will behave like a FIFO (First In, First Out) stack in which the most recent addresses shift the oldest ones. The number of items stored in the stack will be determined by the value of the $ipAddressesToStore variable.
Conclusion
And that’s all. Now every time the Dynamic DNS Update app installed on your smartphone detects a change in your public IP address it will automatically update the own-ip-addresses.lst file via an HTTP call to the update-my-own-public-ip.php script. This change will in turn make you recognized by the check-user-ip.php script and cause the Google Analytics tracking code not to be included throughout your session and your activity will not be tracked at all.
I hope this method will be as useful to you as it is for me and from now on you can access whenever and wherever you want to your website with any device without ever having to worry about altering your Google Analytics statistics.
![How to exclude your own [dynamic] ip from Google Analytics](https://cdn.daniloaz.com/wp-content/uploads/2017/06/page-analytics-chrome-extension.jpg)


2 comments
Join the conversationSu Yin - 08/08/2017
Hi Daniel, thanks for this concise and detailed tutorial, it was exactly what I was looking for. This might seem like a silly question (I’ve still got lots to learn!) but once you’ve gone ahead and excluded all traffic from the dynamic ip so that it doesn’t capture any traffic from the office, what’s your process usually like for any internal testing that you conduct from that point? Taking for example if I’m implementing a new tag on GTM and I want to make sure that it is properly implemented on my website and I verify this by looking at the real-time reporting in GA, how would I do this when it won’t be recorded in GA anymore?
Daniel - 08/08/2017
Thanks Su Yin. You can use the check-user-ip.php script to further analyze incoming traffic and search any specific tag, variable, cookie or other condition to make an exception and enable GA tracking code under certain circumstances even if the request comes from your internal network.
You can for example add a variable to your GET request like “http://www.example.com/?forceGA=1” and then check if that variable is set from the check-user-ip.php script with something like this:
if (isset($_REQUEST['forceGA'] and $_REQUEST['forceGA'] == 1) $isMyOwnIp = false;