One of the few things I do not like about the AWS EC2 service is that all available images (AMIs) used to to launch new instances require a root volume of at least 8 or 10 GB in size and all of them also have a single partition where the root filesystem is mounted on.
In my post The importance of properly partitioning a disk in Linux I discussed why in my opinion this approach is not appropriate and now I will address in a practical way how to divide those volumes into multiple partitions keeping the 8-10 GB base size or making them even smaller to save costs in case you want to deploy smaller servers that do not need as much storage space.
Prerequisites
In order to follow out this procedure it is necessary to have an auxiliary EC2 instance other than the one whose root volume we want to partition. Any instance type will be useful, so you can opt for the most economical currently available (t2.nano). Since Amazon will only charge you for the time it takes to execute the procedure (about 30 minutes) and then you will terminate the instance, the associated cost will be very low.
Error: Your Requested widget " ai_widget-6" is not in the widget list.
- [do_widget_area above-nav-left]
- [do_widget_area above-nav-right]
- [do_widget_area footer-1]
- [do_widget id="wpp-4"]
- [do_widget_area footer-2]
- [do_widget id="recent-posts-4"]
- [do_widget_area footer-3]
- [do_widget id="recent-comments-3"]
- [do_widget_area footer-4]
- [do_widget id="archives-4"]
- [do_widget_area logo-bar]
- [do_widget id="oxywidgetwpml-3"]
- [do_widget_area menu-bar]
- [do_widget id="search-3"]
- [do_widget_area sidebar]
- [do_widget id="search-4"]
- [do_widget id="ai_widget-2"]
- [do_widget id="categories-5"]
- [do_widget id="ai_widget-3"]
- [do_widget id="ai_widget-4"]
- [do_widget id="ai_widget-5"]
- [do_widget_area sub-footer-1]
- [do_widget id="text-4"]
- [do_widget_area sub-footer-2]
- [do_widget_area sub-footer-3]
- [do_widget_area sub-footer-4]
- [do_widget_area upper-footer-1]
- [do_widget id="search-2"]
- [do_widget id="recent-posts-2"]
- [do_widget id="recent-comments-2"]
- [do_widget id="archives-2"]
- [do_widget id="categories-2"]
- [do_widget id="meta-2"]
- [do_widget_area upper-footer-2]
- [do_widget_area upper-footer-3]
- [do_widget_area upper-footer-4]
- [do_widget_area widgets_for_shortcodes]
- [do_widget id="search-5"]
- [do_widget id="ai_widget-6"]
- [do_widget_area wp_inactive_widgets]
- [do_widget id="wpp-2"]
- [do_widget id="text-1"]
- [do_widget id="recent-posts-3"]
- [do_widget id="categories-3"]
- [do_widget id="archives-3"]
- [do_widget id="icl_lang_sel_widget-3"]
If you already have another EC2 instance running in the same region and availability zone, it will not be necessary to create a new one, since you can use the existing one to mount the volumes needed later. Mounting these volumes will not have any significant impact on the performance or capacity of the auxiliary instance used, but it is still a good idea not to use a production server that is critical for you, because if you make a mistake the service can be affected.
It is not essential, but highly recommended, that the auxiliary instance has the same Linux distribution and version as the instance you want to partition so that installing the boot loader in the new volume is as straightforward and trouble-free as possible. For the example of this article I have used an Ubuntu 16.04.2 LTS instance.
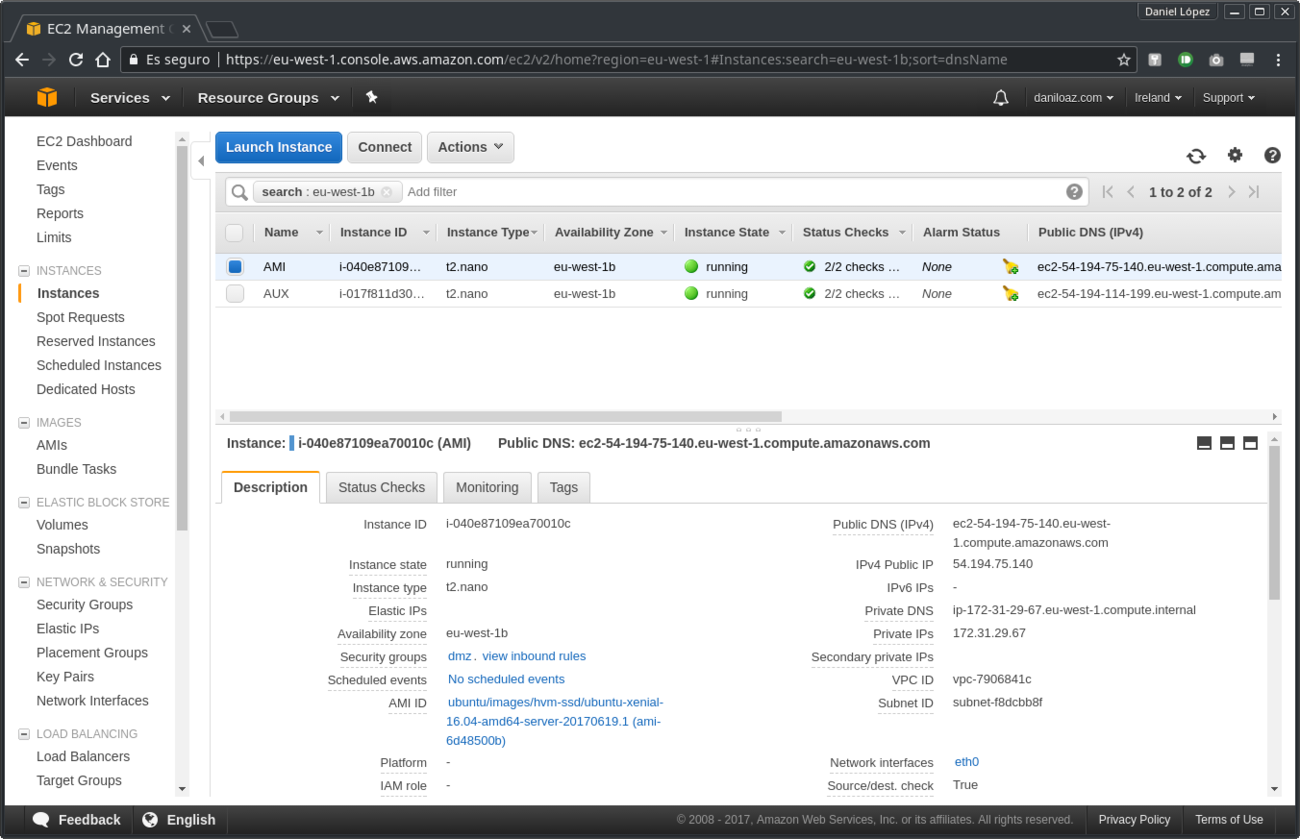
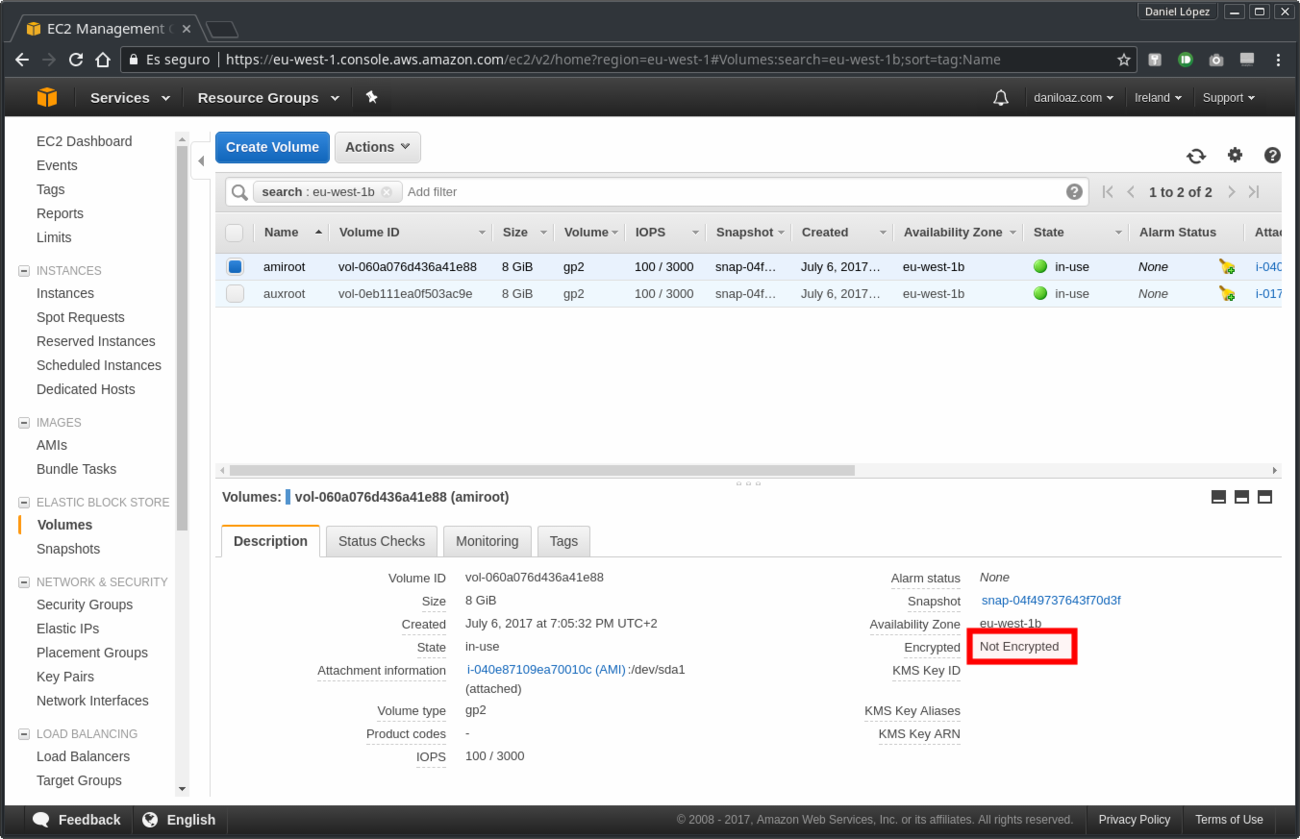
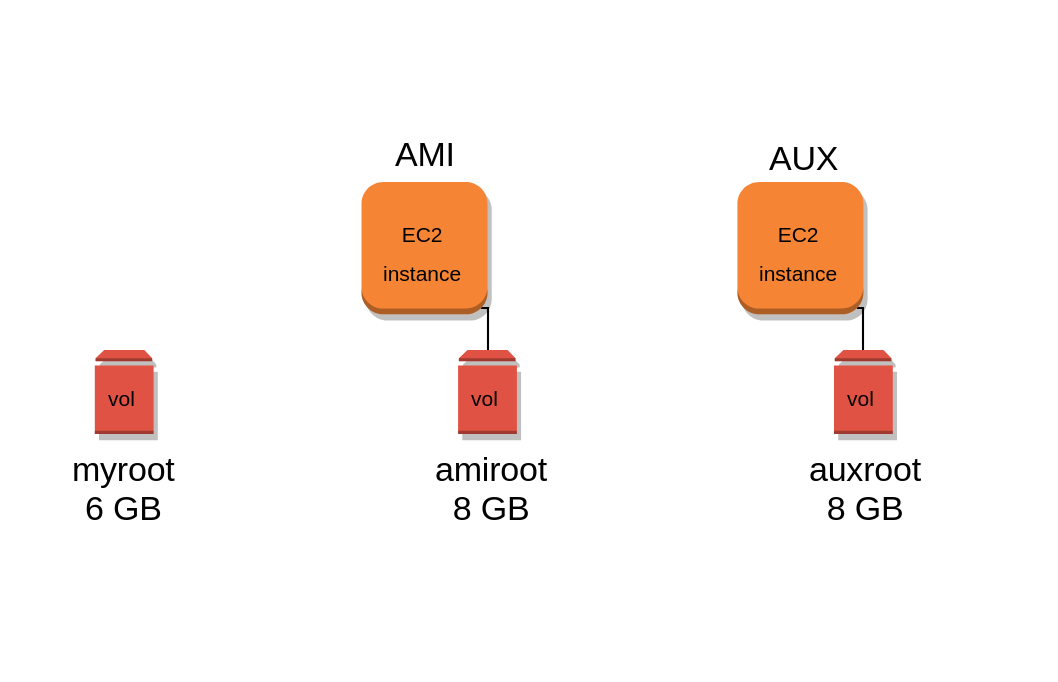
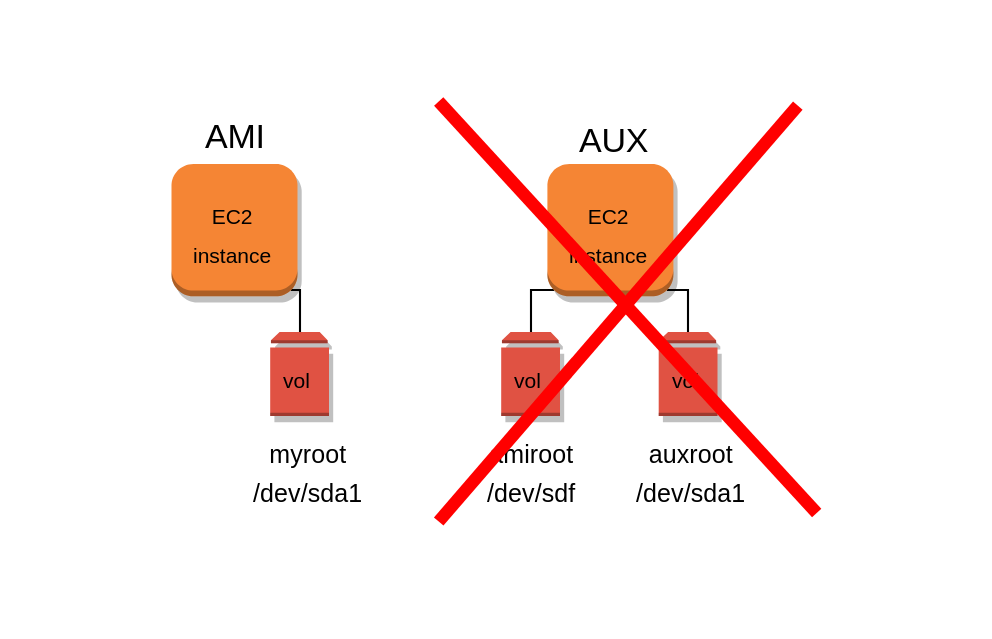
Thus, we start with 2 running instances: the one we want to partition and the auxiliary instance. We will call them AMI and AUX respectively, each with its corresponding root volume: amiroot and auxroot.
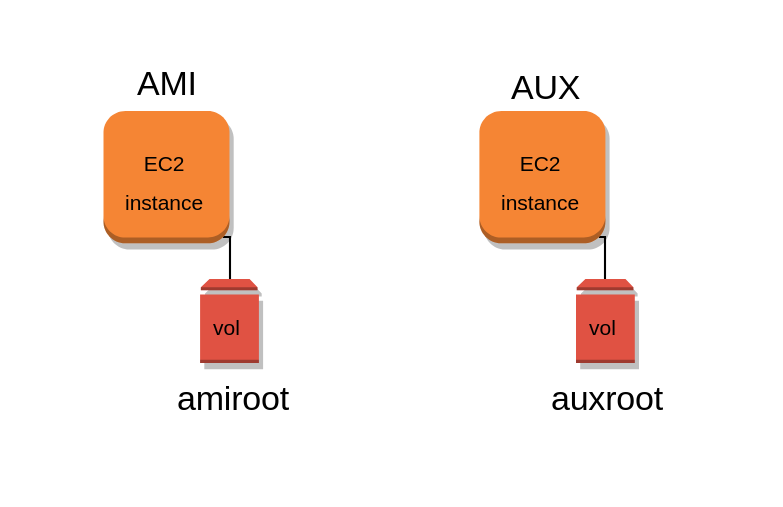
Starting point: AMI and AUX instances with their respective root volume
Initial EC2 instances
Initial EBS volumes
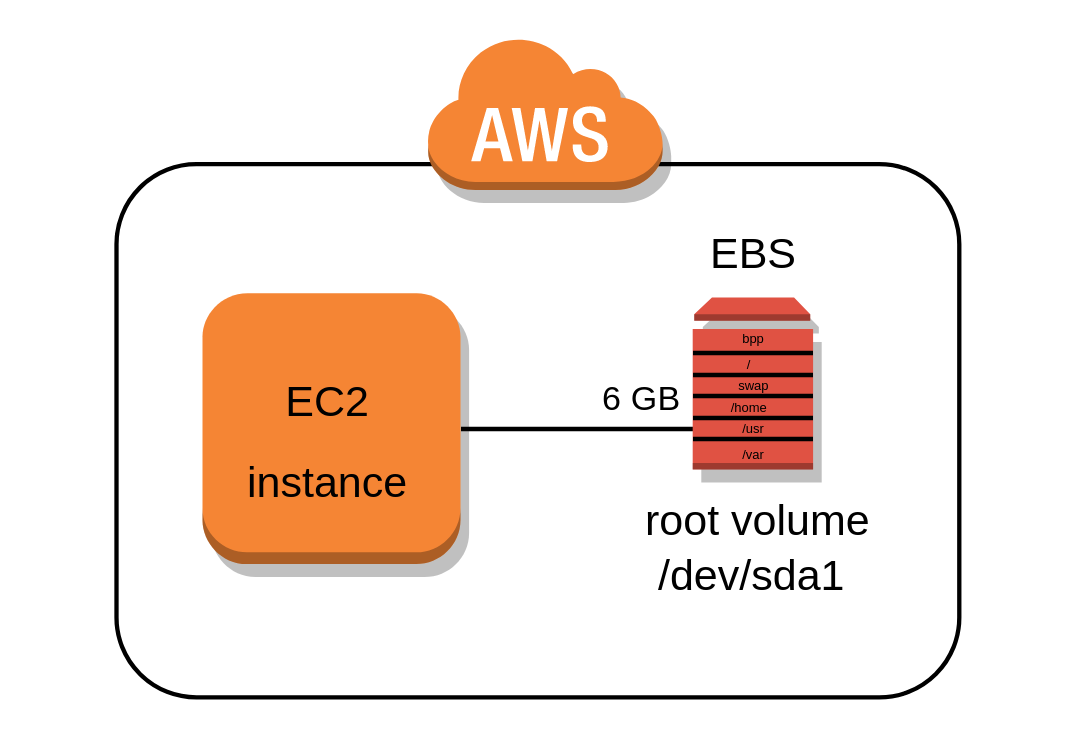
1. Create a new EBS volume
In our example we will create a smaller volume (6 GB) than the 8 GB default size offered by Amazon, but you can choose the size that best suits your needs, be it larger or smaller than 8 GB. You can also take the opportunity to encrypt the new volume, since by default all the root volumes used by Amazon AMIs are not encrypted.
Creation of new EBS volume to partition
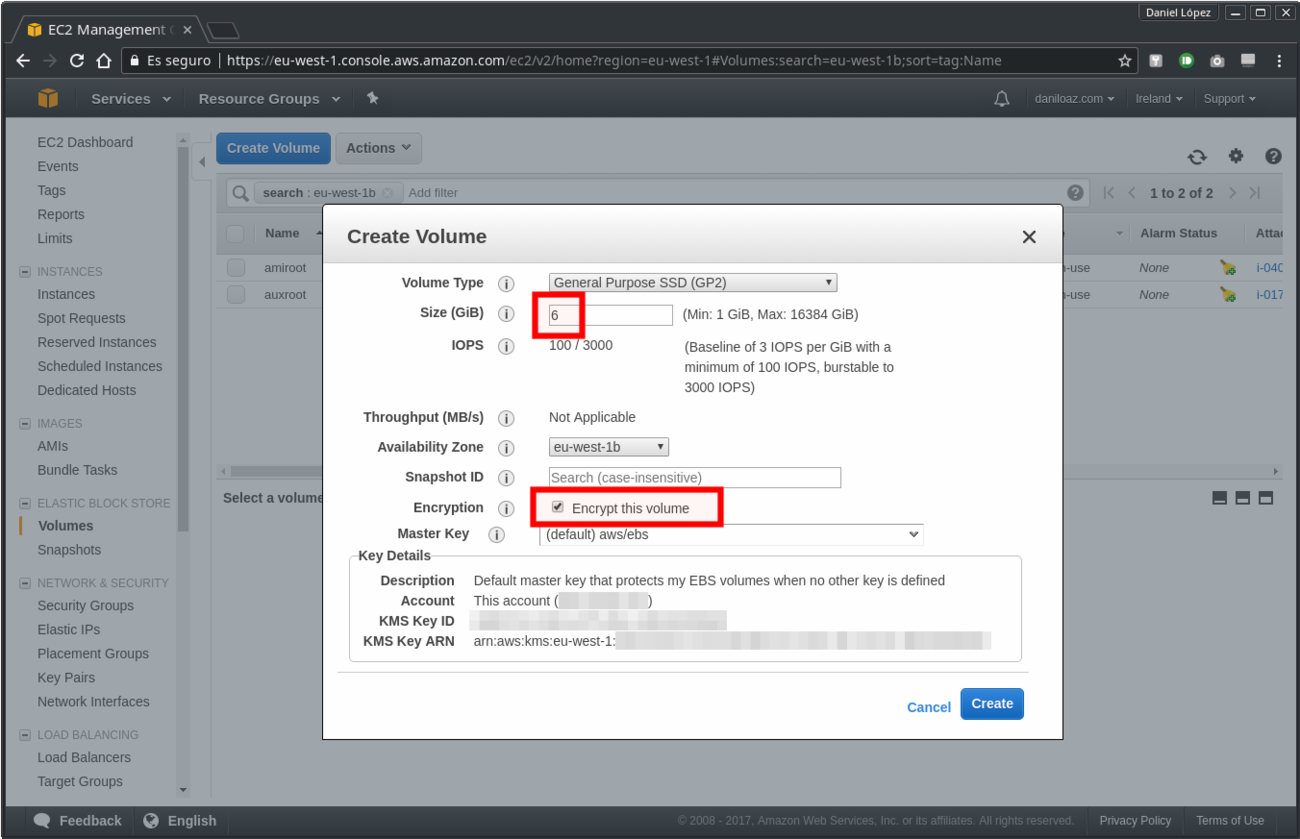
Creation of new encrypted volume of less than 8GB
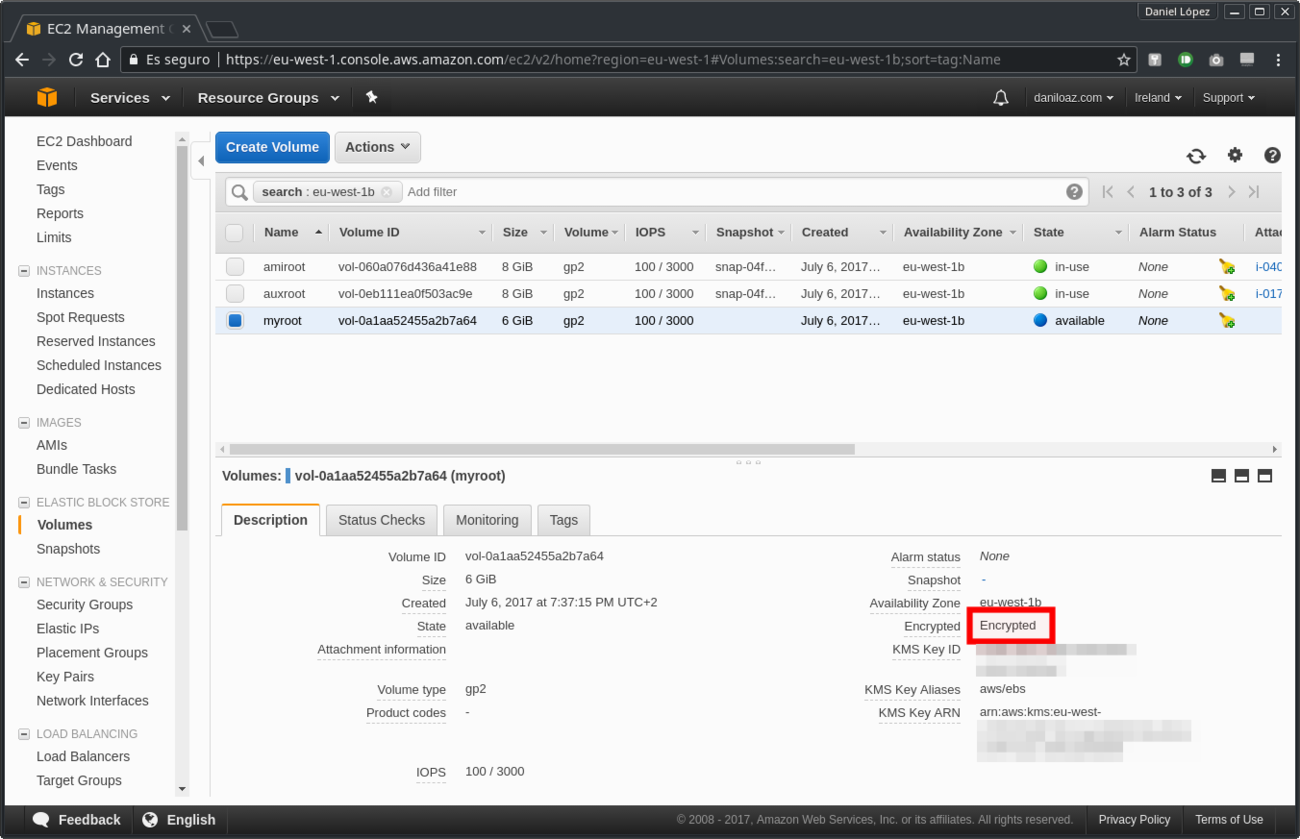
New volume created but not attached to any instance
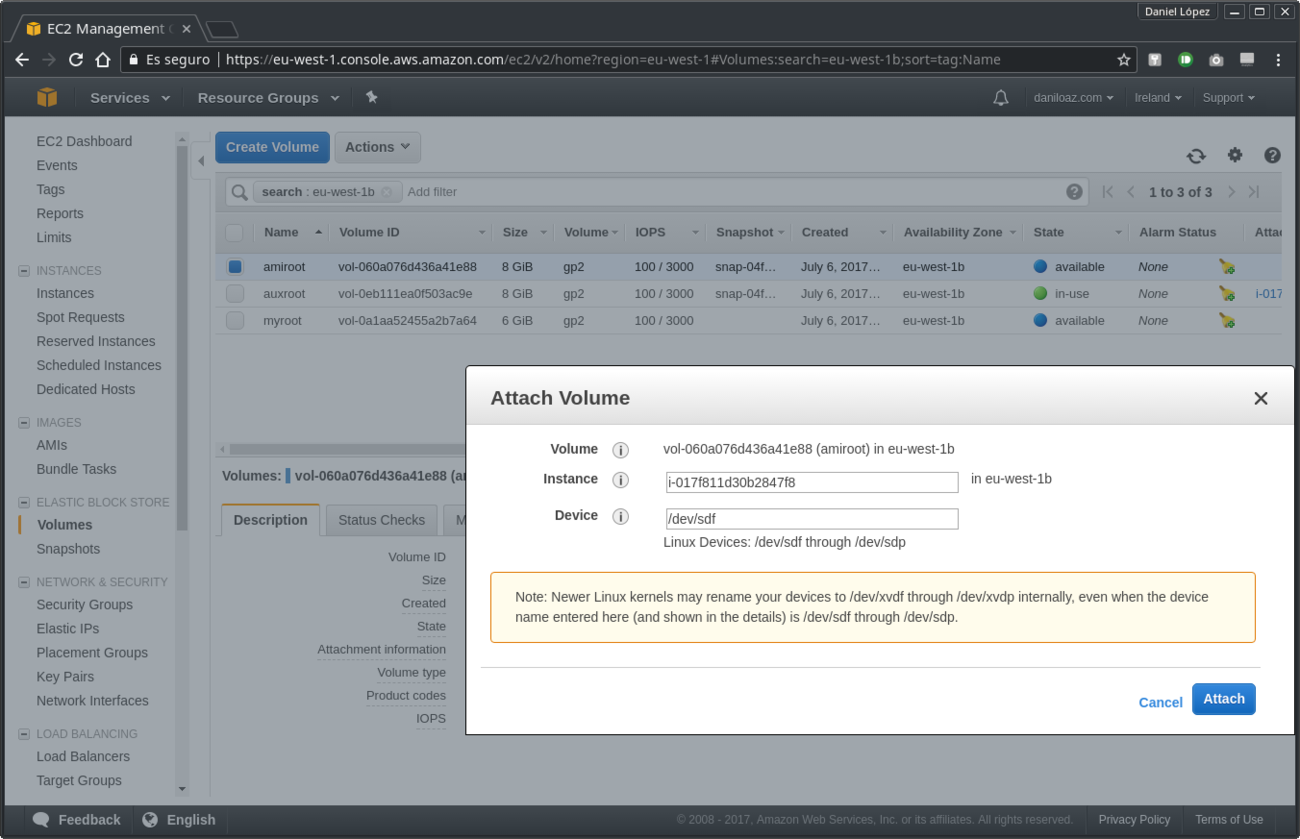
2. Attach amiroot and myroot volumes to the auxiliary instance
Now you will detach the amiroot volume from the AMI instance and re-attach it to the AUX auxiliary instance. For this it is necessary to stop the AMI instance first, since being its root volume can not be detached without stopping it before. On the contrary, both volumes can be hot attached to the auxiliary instance with no problem because its root volume is auxroot and it will remain unchanged. You will assign the /dev/sdf device to the amiroot volume and /dev/sdg to myroot.
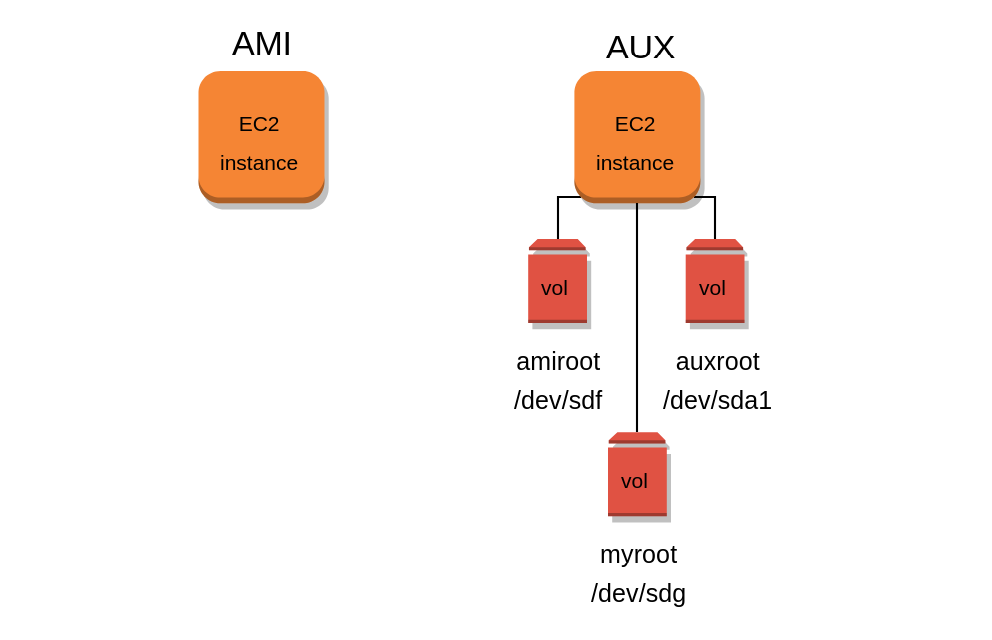
Diagram of auxiliary instance with 3 attached volumes
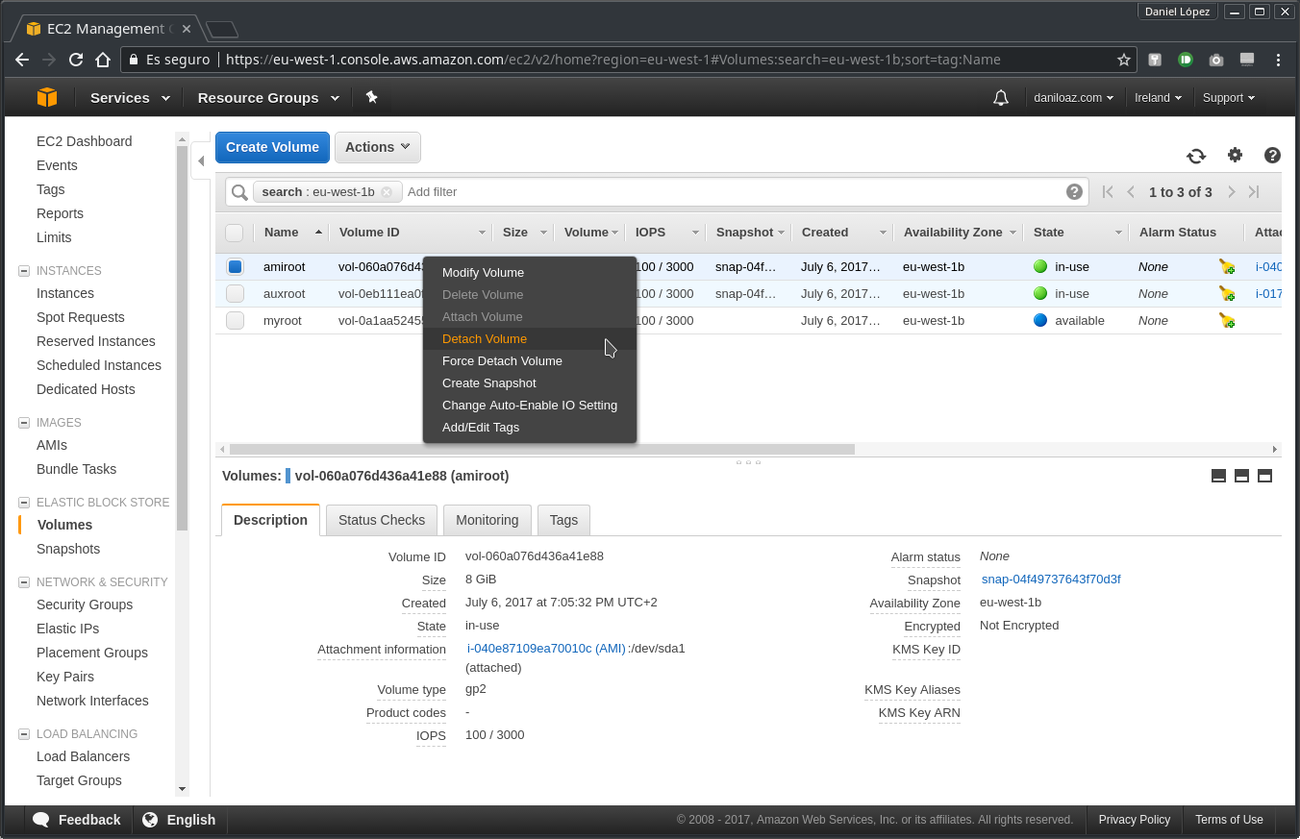
Detaching amiroot volume from AMI instance
Attaching amiroot volume to auxiliary instance
3. Verify the attached volumes are recognized by the auxiliary instance
Access the auxiliary instance through SSH and verify the new attached volumes are available with lsblk command:
~$ ssh ubuntu@ec2-54-194-114-199.eu-west-1.compute.amazonaws.com -i ~/.ssh/awskey.pem
Welcome to Ubuntu 16.04.2 LTS (GNU/Linux 4.4.0-1020-aws x86_64)
...
...
ubuntu@ip-172-31-17-107:~$ lsblk
NAME    MAJ:MIN RM SIZE RO TYPE MOUNTPOINT
xvda    202:0    0   8G  0 disk
└─xvda1 202:1    0   8G  0 part /
xvdf    202:80   0   8G  0 disk
└─xvdf1 202:81   0   8G  0 part
xvdg    202:96   0   6G  0 disk
If everything was ok then amiroot volume should appear as xvdf and myroot as xvdg. As you can see, there is an 8GB partition already created and mounted on /dev/xvdf1 which corresponds to the partition that came with the root volume of the instance created from the AMI. Since myroot volume was created from scratch it doesn’t have any partitions created yet.
4. Create custom partition scheme on myroot volume
It is time to partition the volume to your choice, which was the initial goal. If you have doubts about what partitions to create and how to size them I recommend to have a look to the following article:
Recommended reading:
The importance of properly partitioning a disk in Linux
Here are some parted commands to set up a GPT partition table, a BIOS Boot Partition (BBP) and a suitable partitioning scheme for our example 6GB volume:
~# parted /dev/xvdg
GNU Parted 3.2
Using /dev/xvdg
Welcome to GNU Parted! Type 'help' to view a list of commands.
(parted) mklabel gpt
(parted) mkpart bbp 1MB 2MB
(parted) set 1 bios_grub on
(parted) mkpart root ext4 2MB 20%
(parted) mkpart swap linux-swap 20% 25%
(parted) mkpart home ext4 25% 30%
(parted) mkpart usr ext4 30% 65%
(parted) mkpart var ext4 65% 100%
Once created, the partition table should look like this:
(parted) unit GiB
(parted) p
Model: Xen Virtual Block Device (xvd)
Disk /dev/xvdg: 6.00GiB
Sector size (logical/physical): 512B/512B
Partition Table: gpt
Disk Flags:

Number  Start    End      Size     File system     Name  Flags
 1      0.00GiB  0.00GiB  0.00GiB                  bbp   bios_grub
 2      0.00GiB  1.20GiB  1.20GiB                  root
 3      1.20GiB  1.50GiB  0.30GiB  linux-swap(v1)  swap
 4      1.50GiB  1.80GiB  0.30GiB  ext4            home
 5      1.80GiB  3.90GiB  2.10GiB  ext4            usr
 6      3.90GiB  6.00GiB  2.10GiB  ext4            var
In order to achieve a better performance you will want to check if all partitions are optimally aligned according to the disk geometry. Actually this is only necessary if you created an HDD type EBS volume, such as st1, sc1 or magnetic, since gp2 and io1 volumes are backed by SSD disks (you can see details of different types of AWS EBS volumes at https://docs.aws.amazon.com/AWSEC2/latest/UserGuide/EBSVolumeTypes.html).
(parted) align-check optimal 1
1 aligned
(parted) align-check optimal 2
2 aligned
(parted) align-check optimal 3
3 aligned
(parted) align-check optimal 4
4 aligned
(parted) align-check optimal 5
5 aligned
(parted) align-check optimal 6
6 aligned
However, if you specified partition size using percentages (%) instead of GB, MB or sectors you will not have to worry about this because parted will always align them optimally and the result of the previous check will always be satisfactory.
Error: Your Requested widget " ai_widget-6" is not in the widget list.
- [do_widget_area above-nav-left]
- [do_widget_area above-nav-right]
- [do_widget_area footer-1]
- [do_widget id="wpp-4"]
- [do_widget_area footer-2]
- [do_widget id="recent-posts-4"]
- [do_widget_area footer-3]
- [do_widget id="recent-comments-3"]
- [do_widget_area footer-4]
- [do_widget id="archives-4"]
- [do_widget_area logo-bar]
- [do_widget id="oxywidgetwpml-3"]
- [do_widget_area menu-bar]
- [do_widget id="search-3"]
- [do_widget_area sidebar]
- [do_widget id="search-4"]
- [do_widget id="ai_widget-2"]
- [do_widget id="categories-5"]
- [do_widget id="ai_widget-3"]
- [do_widget id="ai_widget-4"]
- [do_widget id="ai_widget-5"]
- [do_widget_area sub-footer-1]
- [do_widget id="text-4"]
- [do_widget_area sub-footer-2]
- [do_widget_area sub-footer-3]
- [do_widget_area sub-footer-4]
- [do_widget_area upper-footer-1]
- [do_widget id="search-2"]
- [do_widget id="recent-posts-2"]
- [do_widget id="recent-comments-2"]
- [do_widget id="archives-2"]
- [do_widget id="categories-2"]
- [do_widget id="meta-2"]
- [do_widget_area upper-footer-2]
- [do_widget_area upper-footer-3]
- [do_widget_area upper-footer-4]
- [do_widget_area widgets_for_shortcodes]
- [do_widget id="search-5"]
- [do_widget id="ai_widget-6"]
- [do_widget_area wp_inactive_widgets]
- [do_widget id="wpp-2"]
- [do_widget id="text-1"]
- [do_widget id="recent-posts-3"]
- [do_widget id="categories-3"]
- [do_widget id="archives-3"]
- [do_widget id="icl_lang_sel_widget-3"]
When leaving parted it is possible that you receive the following message:
(parted) quit
Information: You may need to update /etc/fstab.
In that case, if you don’t see the new partition scheme with lsblk command you will have to execute the partprobe command and then it should be displayed correctly:
~# lsblk
NAME    MAJ:MIN RM  SIZE RO TYPE MOUNTPOINT
xvda    202:0    0    8G  0 disk
└─xvda1 202:1    0    8G  0 part /
xvdf    202:80   0    8G  0 disk
└─xvdf1 202:81   0    8G  0 part
xvdg    202:96   0    6G  0 disk
├─xvdg1 202:97   0    1M  0 part
├─xvdg2 202:98   0  1.2G  0 part
├─xvdg3 202:99   0  307M  0 part
├─xvdg4 202:100  0  307M  0 part
├─xvdg5 202:101  0  2.1G  0 part
└─xvdg6 202:102  0  2.1G  0 part
5. Format the new partitions
Once you get your desired partition layout you will proceed to format all partitions except BPP and swap partitions. In the example we use the most standard Linux file system, ext4:
~# for I in 2 4 5 6; do mkfs.ext4 /dev/xvdg${I}; done
...
...
~# mkswap /dev/xvdg3
Setting up swapspace version 1, size = 307 MiB (321908736 bytes)
no label, UUID=1aad1fa2-188e-4b7a-8a0f-33f775cdd329
6. Mount partitions
Now mount all partitions whose contents you are interested in replicating from the root disk of the starting AMI. In our example we will mount the root partition (/), /home, /usr and /var of myroot volume. Also mount the root partition of amiroot volume to later sync files from it:
~# mkdir /mnt/amiroot
~# mkdir -p /mnt/myroot/root /mnt/myroot/home /mnt/myroot/usr /mnt/myroot/var

~# tree /mnt
/mnt
├── amiroot
└── myroot
    ├── home
    ├── root
    ├── usr
    └── var

6 directories, 0 files

~# mount /dev/xvdf1 /mnt/amiroot
~# mount /dev/xvdg2 /mnt/myroot/root
~# mount /dev/xvdg4 /mnt/myroot/home
~# mount /dev/xvdg5 /mnt/myroot/usr
~# mount /dev/xvdg6 /mnt/myroot/var
7. Synchronize amiroot contents into its corresponding partition
Use rsync command to synchronize contents of the different directories in the single partition of amiroot root volume into their corresponding separate partitions in myroot volume. You have to be careful not to copy the contents of the same directories that now have their own allocated partition into the new root partition, so be sure to use the rsync –exclude parameter. Since these directories are being excluded, you will have to create them manually, but empty and with the appropriate permissions:
~# rsync -av /mnt/amiroot/home/ /mnt/myroot/home/
~# rsync -av /mnt/amiroot/usr/ /mnt/myroot/usr/
~# rsync -av /mnt/amiroot/var/ /mnt/myroot/var/
~# rsync -av --exclude=home --exclude=usr --exclude=var /mnt/amiroot/ /mnt/myroot/root/
~# mkdir /mnt/myroot/root/home;chmod 755 /mnt/myroot/root/home
~# mkdir /mnt/myroot/root/usr;chmod 755 /mnt/myroot/root/usr
~# mkdir /mnt/myroot/root/var;chmod 755 /mnt/myroot/root/var
It is very important at this point to unmount the original amiroot volume single partition and detach it from the auxiliary instance so that the grub boot loader installer that will be run later can not detect there is another bootable partition that interferes with that in the new partitioned volume. It is not enough just to unmount it with the umount command, but it will also be necessary to detach it from the instance as did previously in section #2.
~# sync && umount /mnt/amiroot
8. Install grub boot loader on new volume myroot
Before doing so be careful to disable the /etc/grub.d/10_linux and /etc/grub.d/20_linux_xen scripts because they can cause problems in detecting the bootable BPP partition. To do this, simply add the exit command to the second line of both files, just after #!/bin/sh.
Error: Your Requested widget " ai_widget-6" is not in the widget list.
- [do_widget_area above-nav-left]
- [do_widget_area above-nav-right]
- [do_widget_area footer-1]
- [do_widget id="wpp-4"]
- [do_widget_area footer-2]
- [do_widget id="recent-posts-4"]
- [do_widget_area footer-3]
- [do_widget id="recent-comments-3"]
- [do_widget_area footer-4]
- [do_widget id="archives-4"]
- [do_widget_area logo-bar]
- [do_widget id="oxywidgetwpml-3"]
- [do_widget_area menu-bar]
- [do_widget id="search-3"]
- [do_widget_area sidebar]
- [do_widget id="search-4"]
- [do_widget id="ai_widget-2"]
- [do_widget id="categories-5"]
- [do_widget id="ai_widget-3"]
- [do_widget id="ai_widget-4"]
- [do_widget id="ai_widget-5"]
- [do_widget_area sub-footer-1]
- [do_widget id="text-4"]
- [do_widget_area sub-footer-2]
- [do_widget_area sub-footer-3]
- [do_widget_area sub-footer-4]
- [do_widget_area upper-footer-1]
- [do_widget id="search-2"]
- [do_widget id="recent-posts-2"]
- [do_widget id="recent-comments-2"]
- [do_widget id="archives-2"]
- [do_widget id="categories-2"]
- [do_widget id="meta-2"]
- [do_widget_area upper-footer-2]
- [do_widget_area upper-footer-3]
- [do_widget_area upper-footer-4]
- [do_widget_area widgets_for_shortcodes]
- [do_widget id="search-5"]
- [do_widget id="ai_widget-6"]
- [do_widget_area wp_inactive_widgets]
- [do_widget id="wpp-2"]
- [do_widget id="text-1"]
- [do_widget id="recent-posts-3"]
- [do_widget id="categories-3"]
- [do_widget id="archives-3"]
- [do_widget id="icl_lang_sel_widget-3"]
Next remove the /boot/grub/grub.cfg file which was the one that brought the AMI in origin and then replace it with another one adapted to your partitioned new volume:
~# rm /mnt/myroot/root/boot/grub/grub.cfg
~# grub-mkconfig -o /mnt/myroot/root/boot/grub/grub.cfg
Now you can install the grub boot loader on the new 6 GB disk:
~# grub-install --target=i386-pc --directory=/mnt/myroot/usr/lib/grub/i386-pc --recheck --boot-directory=/mnt/myroot/root/boot /dev/xvdg
Do not forget to re-enable the 10_linux and 20_linux_xen scripts when you are finished if you have used as your auxiliary instance a server that you will use for other purposes. If not it doesn’t matter because at the end of the procedure the auxiliary instance will be terminated and destroyed.
9. Set new partitions in /etc/fstab file
First it is necessary to obtain partition UUID identifiers using the blkid command. It is best to run as root because otherwise it will not display swap related information.
~# blkid
/dev/xvda1: LABEL="cloudimg-rootfs" UUID="567ab888-a3b5-43d4-a92a-f594e8653924" TYPE="ext4" PARTUUID="1a7d4c6a-01"
/dev/xvdg2: UUID="286a4418-45b4-40c6-aece-6a4e1efd247a" TYPE="ext4" PARTLABEL="root" PARTUUID="56c0cfb6-20eb-4123-a766-420911980fb3"
/dev/xvdg4: UUID="6e244eed-310f-4aae-aaa1-7ef549bbdbd1" TYPE="ext4" PARTLABEL="home" PARTUUID="bdbacb79-532b-410f-853e-f5530c4f9fa7"
/dev/xvdg5: UUID="cceffcdd-1aeb-4aab-b8e0-7ac04893858c" TYPE="ext4" PARTLABEL="usr" PARTUUID="fbee2b01-9d41-4c16-bda6-a4b2abc02a04"
/dev/xvdg6: UUID="b3fe50cb-b147-4b3b-b8ce-17ee445db64c" TYPE="ext4" PARTLABEL="var" PARTUUID="b4983050-a4e6-4d8a-9284-1a269a451d35"
/dev/xvdg3: UUID="1aad1fa2-188e-4b7a-8a0f-33f775cdd329" TYPE="swap" PARTLABEL="swap" PARTUUID="24eecaf3-4942-4ead-bab4-909e359dd5ae"
/dev/xvdg1: PARTLABEL="bbp" PARTUUID="916ca11f-db90-48d1-93d2-de6a99b60f40"
Then move those identifiers to /mnt/myroot/root/etc/fstab file as follows:
UUID=286a4418-45b4-40c6-aece-6a4e1efd247a  /      ext4   defaults,discard,noatime,errors=remount-ro      0 1
UUID=6e244eed-310f-4aae-aaa1-7ef549bbdbd1  /home  ext4   defaults,noatime,acl,user_xattr,nodev,nosuid    0 2
UUID=cceffcdd-1aeb-4aab-b8e0-7ac04893858c  /usr   ext4   defaults,noatime,nodev,errors=remount-ro        0 2
UUID=b3fe50cb-b147-4b3b-b8ce-17ee445db64c  /var   ext4   defaults,noatime,nodev,nosuid                   0 2
UUID=1aad1fa2-188e-4b7a-8a0f-33f775cdd329  swap   swap   defaults                                        0 0
tmpfs                                      /tmp   tmpfs  defaults,noatime,nodev,noexec,nosuid,size=256m  0 0
If you want to know more about the different mount options used in the example I recommend you again reading my article The importance of properly partitioning a disk in Linux.
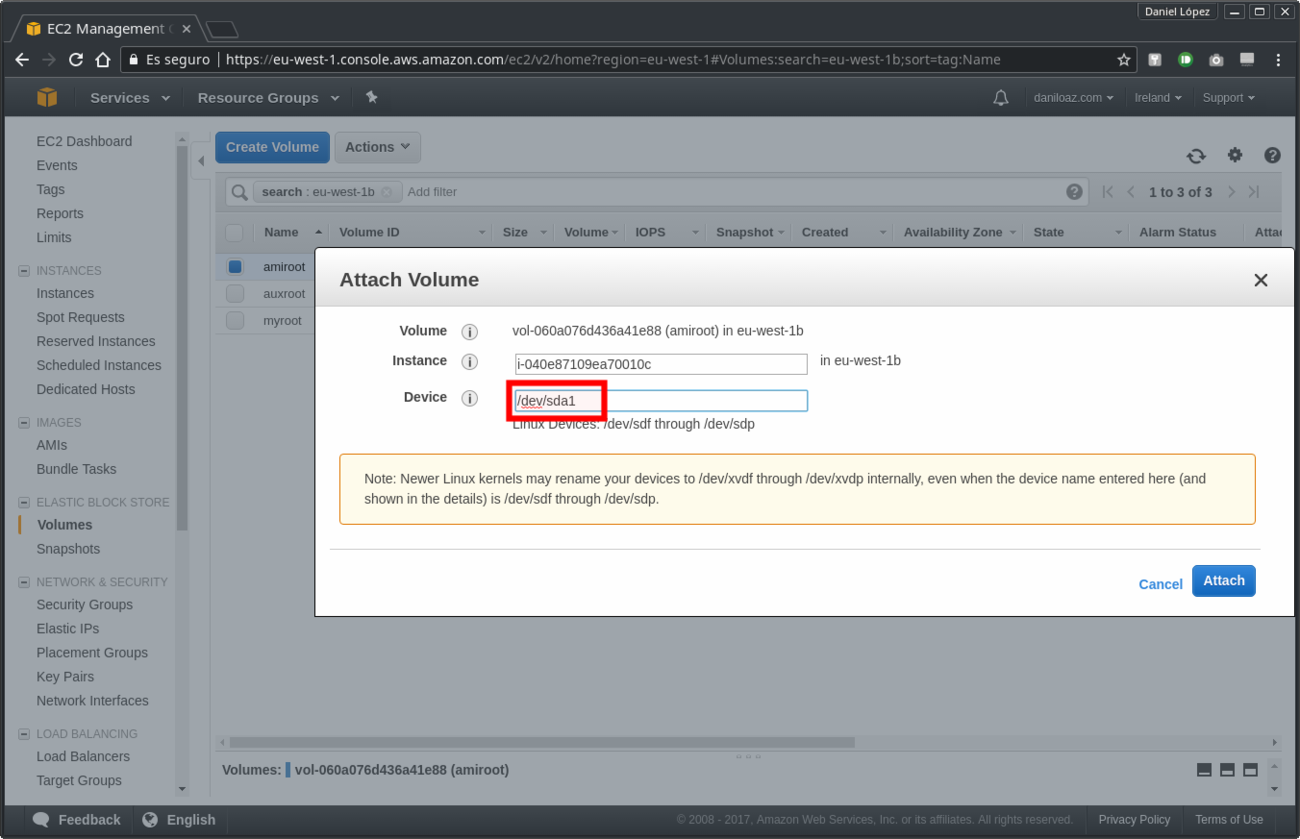
10. Attach the new volume as the root volume of the instance launched in first place from the AMI
As part of the last step of this procedure, unmount all partitions previously mounted and detach the myroot volume already partitioned, configured and bootable from the auxiliary instance. Then re-attach it to the final instance in which it will be used, the AMI instance launched at first.
~# sync && umount /mnt/myroot/root /mnt/myroot/home /mnt/myroot/usr /mnt/myroot/var
It is very important to attach the myroot volume to the EC2 instance as /dev/sda1 device in order to state it as root volume. Otherwise you will have problems booting the operating system.
If everything turned out well your instance should boot normally and you will be able to see in the EC2 instance system log the login message as it is shown in the third picture below. If something goes wrong you will get more information about the issue in the same log.
Final result diagram: AMI instance with root volume attached
Very important: attach volume as root volume (/dev/sda1)
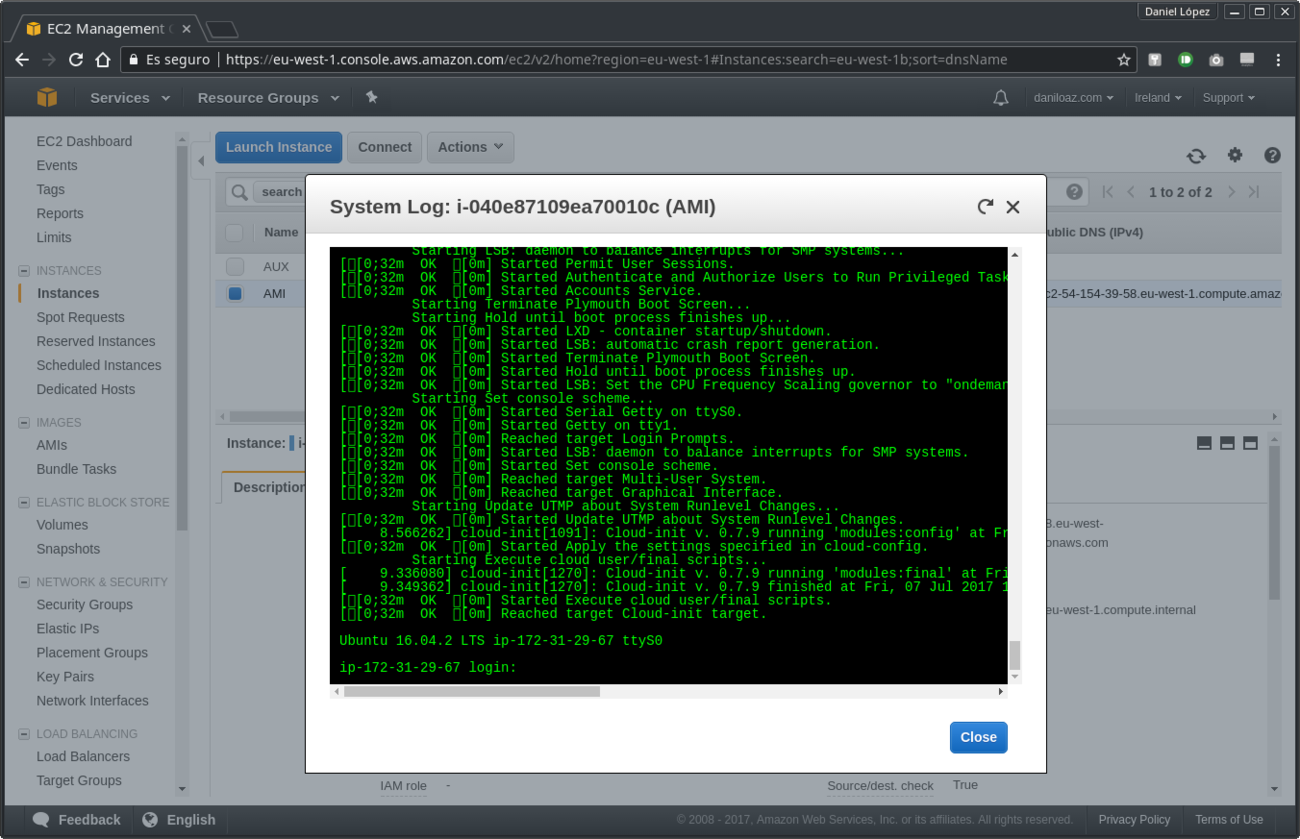
System log of EC2 instance successfully started
And that’s all. Now if you access the new instance you will see that everything is the same as before, but if you do a df -h you will see that all partitions you created before are displayed as mounted, and if you run the free -h command you will see a swap amount available equivalent to the size of the partition created in step #4. Do not forget to terminate the auxiliary instance if you are not going to use it anymore.
Enjoy your new system, which is now safer and better prepared to deal with changes that may occur in the future!
27 comments
Join the conversationJames K. - 02/07/2018
This does not appear to work with the AWS stock RHEL 7.4 AMI. Tailored it somewhat to utilize grub2, but to no avail. Any suggestions are welcome. I get no logs from the instance and it fails one of the status checks at boot.
Daniel - 02/07/2018
If for any reason you can’t see the system log you can attach the volume to other auxiliar instance that boots well and inspect syslog and other logs to try to find the causes.
James - 01/08/2018
I got lost on step 9.. on the stab, should I also include the line “cloudimg-rootfs” on the default content.. got confuse on how it will work with “/”
James - 01/08/2018
I got lost on 9, should I replace even the default line on stab for “cloudimg-rootfs”
James B.
Daniel - 02/08/2018
Forget about the default “cloudimg-rootfs”, which is only a label that points to Amazon’s AMI original partition UUID. You have to configure your new fstab file with UUID’s from your new partitioned volume as in the example. Specifically, in the example / corresponds to the second partition (/dev/xvdg2).
Tarak Sinha - 09/01/2019
Hi,
It’s really good article for custum partition but can’t find grub-mkconfig command on RHEL6, is there any suggestion do it.?
your suggestion will be appreciated.
Daniel - 09/01/2019
I think the command is grub2-mkconfig instead of grub-mkconfig in RHEL/Fedora/CentOS systems. You can get more info here: https://unix.stackexchange.com/questions/152222/equivalent-of-update-grub-for-rhel-fedora-centos-systems
Rahul Chaudhary - 21/01/2019
Hello Daniel. Thanks for such a wonderful article. I tried these steps, and countless others from other blogs, but somehow it doesn’t work for me. You are my only hope at this point.
Below are the high-level steps that I performed.
1. I want to shrink size of ami-0a6b7e0cc0b1f464f from 30GB to 2GB which is an ecs-optimized ami in us-east-1 region.
2. I start a t3.micro instance of ami-0a6b7e0cc0b1f464f, then make a new volume from the snapshot of this AMI – I am calling this the “source” volume. I also create another volume (without any snapshot) of size 2GB – I am calling this the “target” volume.
3. I attached the source and the volume to my instance. Here is what they look like.
NAME MAJ:MIN RM SIZE RO TYPE MOUNTPOINT
nvme0n1 259:0 0 30G 0 disk <– This is the root volume.
├─nvme0n1p1 259:1 0 30G 0 part /
└─nvme0n1p128 259:2 0 1M 0 part
nvme1n1 259:3 0 30G 0 disk <– This is the source volume.
├─nvme1n1p1 259:4 0 30G 0 part
└─nvme1n1p128 259:5 0 1M 0 part
nvme2n1 259:6 0 2G 0 disk <– This is the target volume.
4. Using the gdisk utility I re-formated the target volume and then using mkfs.ext4 created the filesystem. The target volume now looks like below and is exactly the same as source.
Number Start End Size File system Name Flags
128 1049kB 2097kB 1049kB BIOS Boot Partition bios_grub
1 2097kB 2147MB 2145MB ext4 Linux filesystem
5. I then used rsync to copy files to target volume, unmounted the source volume and detached that volume completely.
6. Following your steps I installed the grub2 and changed UUID in my target volume's /etc/fstab file.
7. Finally I unmounted and detached my target volume. Took it's snapshot, created a new AMI, and started a new instance off of that AMI.
The instances fail on one of the health check. There are no logs visible, so I am not sure where to go from here. Please help.
Daniel - 22/01/2019
I would need the output of parted -l command from the system you have all the volumes attached to and the /etc/fstab, /boot/grub/grub.cfg and /boot/grub/menu.lst files. Also a screenshot from EC2 instance console and system log if possible, please.
Atul Tyagi - 06/03/2019
It is also not working for me i followed all the steps.
Daniel - 06/03/2019
Which AMI/OS is your root volume? What errors do you get and where?
Dayakar - 08/07/2019
does nfs available in aws instances?or we need to use only EFS ?
if nfs available how to configure it?
Daniel - 09/07/2019
Sure, it is available as any other tool or package included in your distro. But EFS, which is basically an nfs server, provides extra features and “unlimited” storage, and you don’t have to setup anything on the server side.
dayakar - 19/09/2019
when we create a snapshot of a volume and used it on other volume ,are we copying the whole data from volume1 to volume2 ?if it is so,how it is very quick
Ian Carson - 01/05/2020
Excellent article Daniel – really put me on the right track for partitioning a volume for hardening.
Couple of tweaks for Ubuntu 18.04
1. Mount point for /dev/xvdg2 should be /mnt/myroot – this allows the other mounts to come in at the same level as / in the final outcome. Using /mnt/myroot/root conflicts with the /root folder for the root user
2. 1. above makes the creation of folders for var home and usr unnecessary
3. /boot/grub/grub.cfg needs to be manually modified after grub-install is run. Modify the menu-entry “linux” component changing root=/dev/xvdg2 to instead read root=UUID=
This allows the volume to boot when attaching to the original instance for testing, otherwise it fails with device /dev/xvdg2 not found. I realize it’s “naughty” to manually change the grub.cfg file so once this change has allowed the volume to boot the test machine run update-grub on the test machine and that should fix everything to the way it should be.
Thanks again
Regards
Ian Carson
Ian Carson - 01/05/2020
Missing from 3. root=UUID=uuid of the new root partition
Javis Nche - 26/08/2021
Hi Ian,
I appreciate your comments.
following your 3rd point, how do I manually modify the /boot/grub/grub.cfg after grub-install is run.
Can you please walk me through the steps to modify the menu-entry “linux” component changing root=/dev/xvdg2 to instead read root=UUID= ?
Regards
Guy - 09/10/2020
Hi Daniel
Firstly thank you for this post it has got me underway in an attempt to provide an AMI with a partitioned disk which reflects our ISO installer.
I followed this article very closely with an exception to incorporate LVM partitions.
I used this rhel 7.8 ami – ami-009f8651dc5341434
& used grub2 commands instead.
I receive failed status checks which I have very little info to debug… 🙁
Is this only working on Ubuntu?
Daniel - 27/10/2020
I only tested it on Ubuntu, but there is no reason why it cannot also work in RHEL. However, it will probaly be necessary to make changes in the procedure to adapt to the differences between the two distros.
rPerron - 01/04/2021
Tried this on an Amazon Linux 2 AMI. All went well but it didn’t boot. The generated grub.cfg needs to be fixed. Use the AMI version of grub.cfg and change the UIDs. Also watch out for the filesystem type.
Thanks for the article!
Brad - 13/04/2021
Daniel, you mention ‘Before doing so be careful to disable the /etc/grub.d/10_linux and /etc/grub.d/20_linux_xen scripts’. Should those be modified at e.g. /mnt/myroot/root/etc/grub.d/10_linux or /etc/grub.d/10_linux ?
Brad - 11/06/2021
To answer my own question: those should be modified at plain /etc, not /mnt/myroot/root/etc.
Brad - 11/06/2021
This process works on Ubuntu 20 with some slight modifications. The most important one is that grub will need an extra config to ignore /dev/xvda1 and only pick up the mounted RootVol.
GRUB_OS_PROBER_SKIP_LIST=$(grub-probe –target=fs_uuid –device /dev/xvda1)@/dev/xvda1
must be exported or set prior to the grub-mkconfig call, and will be respected by the script /etc/grub.d/30_os-prober.
Kasper Nielsen - 16/12/2021
You mention other minor changes for Ubuntu 20 – Can you list them?
Javis Nche - 25/08/2021
Hello Daniel,
Thank you for the great article.
I followed the steps very closely and have tried at least 5 times and it did not work for me.
It actually booted but I had a “failed status check”.
Not sure on what went wrong and how I can sort this out.
AKN - 14/12/2021
Is it possible to follow the same procedure by creating LVM ? Tried the steps and found the following error in Centos7.
=======================================================================================
[root@ip-172-31-25-164 ~]# grub2-install –target=i386-pc –directory=/mnt/disk/usr/lib/grub/i386-pc –recheck –boot-directory=/mnt/disk/boot –skip-fs-probe /dev/bootvg/bootlv
Installing for i386-pc platform.
grub2-install: warning: File system `xfs’ doesn’t support embedding.
grub2-install: warning: Embedding is not possible. GRUB can only be installed in this setup by using blocklists. However, blocklists are UNRELIABLE and their use is discouraged..
grub2-install: error: will not proceed with blocklists
Deb - 02/03/2022
Hi Daniel,
Seems this does not work for RHEL6. Can you please share similar steps for RHEL6
it fails at the grub-install stage where the system is unable to find the new disk under the /boot/grub/device.map file