GNU/Linux, Open Source, Cloud Computing, DevOps and more...

How to use 2 network interfaces on the same AWS subnet in Linux

No comments

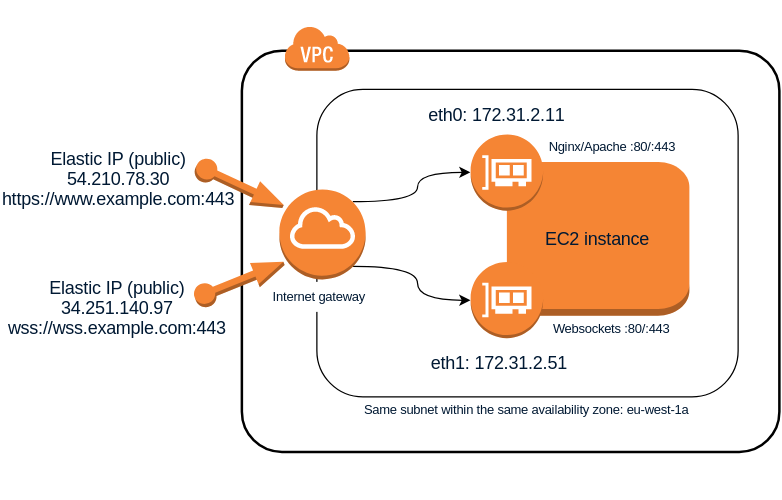
The following Linux procedure describes how to use at the same time 2 network interfaces connected to the same AWS subnet and, which is more important, how to make both communication works well internally (between hosts on the same subnet) and also externally (both interfaces visible from the Internet). This can be useful for example when you want the same EC2 instance to host a web server serving http or https requests and at the same time have a websockets server ws:// or wss:// listening on the same port 80 or 443 respectively. Although there are other ways to achieve this such as configuring Nginx to be able to discriminate web traffic (http) from websockets traffic (ws) and act as a proxy to redirect the corresponding requests to the websockets server, this other solution I propose seems simpler and to some extent more efficient because it is not necessary to redirect traffic, which will always introduce a small latency, and allows to keep both servers completely independent within the same host. The only drawback is that you will need to assign 2 Elastic IP addresses to the same EC2 instance instead of only 1, but at the same time this will give you more flexibility when establishing rules in the security groups or in the subnet NAT rules.


Error: Your Requested widget " ai_widget-6" is not in the widget list.
  • [do_widget_area above-nav-left]
    • [do_widget_area above-nav-right]
      • [do_widget_area footer-1]
        • [do_widget id="wpp-4"]
      • [do_widget_area footer-2]
        • [do_widget id="recent-posts-4"]
      • [do_widget_area footer-3]
        • [do_widget id="recent-comments-3"]
      • [do_widget_area footer-4]
        • [do_widget id="archives-4"]
      • [do_widget_area logo-bar]
        • [do_widget id="oxywidgetwpml-3"]
      • [do_widget_area menu-bar]
        • [do_widget id="search-3"]
      • [do_widget_area sidebar]
        • [do_widget id="search-4"]
        • [do_widget id="ai_widget-2"]
        • [do_widget id="categories-5"]
        • [do_widget id="ai_widget-3"]
        • [do_widget id="ai_widget-4"]
        • [do_widget id="ai_widget-5"]
      • [do_widget_area sub-footer-1]
        • [do_widget id="text-4"]
      • [do_widget_area sub-footer-2]
        • [do_widget_area sub-footer-3]
          • [do_widget_area sub-footer-4]
            • [do_widget_area upper-footer-1]
              • [do_widget id="search-2"]
              • [do_widget id="recent-posts-2"]
              • [do_widget id="recent-comments-2"]
              • [do_widget id="archives-2"]
              • [do_widget id="categories-2"]
              • [do_widget id="meta-2"]
            • [do_widget_area upper-footer-2]
              • [do_widget_area upper-footer-3]
                • [do_widget_area upper-footer-4]
                  • [do_widget_area widgets_for_shortcodes]
                    • [do_widget id="search-5"]
                    • [do_widget id="ai_widget-6"]
                  • [do_widget_area wp_inactive_widgets]
                    • [do_widget id="wpp-2"]
                    • [do_widget id="text-1"]
                    • [do_widget id="recent-posts-3"]
                    • [do_widget id="categories-3"]
                    • [do_widget id="archives-3"]
                    • [do_widget id="icl_lang_sel_widget-3"]

                  The following example shows how to use on an EC2 instance with Ubuntu 16.04.2 LTS operating system two different network interfaces within the same subnet 172.31.0.0.0/20 that corresponds by default to the Amazon Web Services eu-west-1a Availability Zone. Note, however, that the procedure is perfectly applicable to any other network address (CIDR) and can also be used on any other Linux server outside of AWS.

                  1.- Create a new network interface and attach it to your instance

                  Create a new network interface (EC2 -> Network Interfaces -> Create Network Interface) from the AWS management console. Then make sure that the new interface is in the same availability zone as the instance, otherwise you will not be able to attach it. In general it’s indifferent to use dynamic IP addressing (Private IP: auto assign) or static when configuring your own IP address.

                  Once created attach the new interface to your EC2 instance from the same screen where you created it. When the attachment process is finished and the interface becomes available (in-use status) access the instance and enable the second network interface:

                  root@ip-172-31-2-11:~# ifconfig eth1 up 
                  root@ip-172-31-2-11:~# ifconfig 
                  eth0      Link encap:Ethernet  HWaddr 06:c3:15:26:eb:ac   
                            inet addr:172.31.2.11  Bcast:172.31.15.255  Mask:255.255.240.0 
                            inet6 addr: fe80::4c3:15ff:fe26:ebac/64 Scope:Link 
                            UP BROADCAST RUNNING MULTICAST  MTU:9001  Metric:1 
                            RX packets:4983 errors:0 dropped:0 overruns:0 frame:0 
                            TX packets:1344 errors:0 dropped:0 overruns:0 carrier:0 
                            collisions:0 txqueuelen:1000  
                            RX bytes:6716291 (6.7 MB)  TX bytes:128785 (128.7 KB) 
                   
                  eth1      Link encap:Ethernet  HWaddr 06:b4:56:4c:9d:e2   
                            inet6 addr: fe80::4b4:56ff:fe4c:9de2/64 Scope:Link 
                            UP BROADCAST RUNNING MULTICAST  MTU:1500  Metric:1 
                            RX packets:8 errors:0 dropped:0 overruns:0 frame:0 
                            TX packets:7 errors:0 dropped:0 overruns:0 carrier:0 
                            collisions:0 txqueuelen:1000  
                            RX bytes:448 (448.0 B)  TX bytes:578 (578.0 B) 
                   
                  lo        Link encap:Local Loopback   
                            inet addr:127.0.0.1  Mask:255.0.0.0 
                            inet6 addr: ::1/128 Scope:Host 
                            UP LOOPBACK RUNNING  MTU:65536  Metric:1 
                            RX packets:160 errors:0 dropped:0 overruns:0 frame:0 
                            TX packets:160 errors:0 dropped:0 overruns:0 carrier:0 
                            collisions:0 txqueuelen:1  
                            RX bytes:11840 (11.8 KB)  TX bytes:11840 (11.8 KB)

                  Error: Your Requested widget " ai_widget-6" is not in the widget list.
                  • [do_widget_area above-nav-left]
                    • [do_widget_area above-nav-right]
                      • [do_widget_area footer-1]
                        • [do_widget id="wpp-4"]
                      • [do_widget_area footer-2]
                        • [do_widget id="recent-posts-4"]
                      • [do_widget_area footer-3]
                        • [do_widget id="recent-comments-3"]
                      • [do_widget_area footer-4]
                        • [do_widget id="archives-4"]
                      • [do_widget_area logo-bar]
                        • [do_widget id="oxywidgetwpml-3"]
                      • [do_widget_area menu-bar]
                        • [do_widget id="search-3"]
                      • [do_widget_area sidebar]
                        • [do_widget id="search-4"]
                        • [do_widget id="ai_widget-2"]
                        • [do_widget id="categories-5"]
                        • [do_widget id="ai_widget-3"]
                        • [do_widget id="ai_widget-4"]
                        • [do_widget id="ai_widget-5"]
                      • [do_widget_area sub-footer-1]
                        • [do_widget id="text-4"]
                      • [do_widget_area sub-footer-2]
                        • [do_widget_area sub-footer-3]
                          • [do_widget_area sub-footer-4]
                            • [do_widget_area upper-footer-1]
                              • [do_widget id="search-2"]
                              • [do_widget id="recent-posts-2"]
                              • [do_widget id="recent-comments-2"]
                              • [do_widget id="archives-2"]
                              • [do_widget id="categories-2"]
                              • [do_widget id="meta-2"]
                            • [do_widget_area upper-footer-2]
                              • [do_widget_area upper-footer-3]
                                • [do_widget_area upper-footer-4]
                                  • [do_widget_area widgets_for_shortcodes]
                                    • [do_widget id="search-5"]
                                    • [do_widget id="ai_widget-6"]
                                  • [do_widget_area wp_inactive_widgets]
                                    • [do_widget id="wpp-2"]
                                    • [do_widget id="text-1"]
                                    • [do_widget id="recent-posts-3"]
                                    • [do_widget id="categories-3"]
                                    • [do_widget id="archives-3"]
                                    • [do_widget id="icl_lang_sel_widget-3"]

                                  2.- Configure the eth1 interface to modify the routing table when it is enabled

                                  As you can see from the output of the above ifconfig command, the eth1 interface has no IP address assigned to it because there is no configuration available for it. Configuration of network interfaces in Ubuntu/Debian is located in /etc/network/interfaces.d/ directory. There you will find an eth0.cfg file corresponding to the first network interface, so there you will also create a second eth1.cfg file with the following configuration:

                                  # The secondary network interface
                                  auto eth1
                                  iface eth1 inet dhcp
                                  
                                  # The following rules allow the operation of this secondary network interface on the same subnet as eth0,
                                  # something that is not possible by default since there is a default route in the routing table that always
                                  # forces packets to go out using the same network interface even if their IP indicates that they come from
                                  # the other one.
                                  
                                  # In case these rules don't work, activate arp filter:
                                  # sysctl -w net.ipv4.conf.all.arp_filter=1
                                  # If the result is satisfactory, make the change permanent:
                                  # echo "net.ipv4.conf.all.arp_filter = 1" >> /etc/sysctl.conf
                                  
                                  # Create separate routing tables for each network interface
                                  # These tables must be defined in the /etc/iproute2/rt_tables file:
                                  # 10 eth0
                                  # 20 eth1
                                  post-up ip route add 172.31.0.0/20 dev eth0 src 172.31.2.11 table eth0
                                  post-up ip route add 172.31.0.0/20 dev eth1 src 172.31.2.51 table eth1
                                  
                                  # Force packets to go out using the appropriate network interface based on their source or destination IP
                                  post-up ip rule add from 172.31.2.11 table eth0
                                  post-up ip rule add from 172.31.2.51 table eth1
                                  
                                  # Set the same default gateway for both network interfaces
                                  post-up ip route add default via 172.31.0.1 dev eth1 table eth1
                                  post-up ip route add default via 172.31.0.1 dev eth0 table eth0
                                  
                                  # ip route changes have no effect on the classic routing table (netstat -rn).
                                  # The following rules force packets that originate on the server to always go out using eth0 by default
                                  post-up route del default
                                  post-up route add default gw 172.31.0.1 eth0

                                  3.- Create separate routing tables for each network interface

                                  Edit /etc/iproute2/rt_tables file and add the following lines at the end:

                                  10 eth0
                                  20 eth1

                                  4.- Restart the networking service

                                  Once the above changes have been made, restart the networking service:

                                  $ sudo service networking restart

                                  If everything went well, ifconfig command should show now the eth1 interface with its assigned IP address and you should be able to access the instance via SSH through any of its internal IP addresses from other instances in the same subnet. However, by default AWS will not assign any public IP to the second network interface, so if you want to access it from the Internet you will have to associate a new elastic IP address to it. From that moment on you will be able to log in to your server from the Internet using any of its public IP addresses.


                                  About the author

                                  Daniel López Azaña
                                  Freelance AWS Cloud Solution Architect & Linux Sysadmin

                                  Entrepreneur, a generator of ideas and restless mind. Passionate about new technologies, especially Linux systems and Open Source Software. I also like to write about Technology News, Cloud Computing, AWS, DevOps, DevSecOps, System Security, Web Development and Programming, SEO, Science, Innovation, Entrepreneurship, etc.

                                  DanielHow to use 2 network interfaces on the same AWS subnet in Linux

                                  Related Posts

                                  Leave a Reply

                                  Your email address will not be published.