If you have an unencrypted AMI you can share it with another AWS account directly without doing anything special. But if the AMI is encrypted, things get complicated, as the destination account won’t have the encryption key to decrypt its snapshots and you won’t be able to share it.
Therefore, if you need to share an encrypted AMI from an EC2 instance from one AWS account to another, you’ll need to follow this procedure to make it work properly:
1.- Create a new Customer managed key in the AWS KMS service
You’ll need to create a new customer managed key in AWS KMS following these steps:

Step 1

Step 2

Step 3

Step 4

Step 5
Adding special permissions to the KMS key
If you need to add special permissions to the KMS key, you can edit its JSON code directly. For example, in the following example you can add permissions to use the key for encryption and decryption to a specific IAM role. In the example, account aaaaaaaaaaaa is the source and bbbbbbbbbbbbb is the destination:
{
    "Version": "2012-10-17",
    "Id": "key-consolepolicy-3",
    "Statement": [
        {
            "Sid": "Enable IAM User Permissions",
            "Effect": "Allow",
            "Principal": {
                "AWS": [
                    "arn:aws:iam::aaaaaaaaaaaa:root",
                    "arn:aws:iam::bbbbbbbbbbbbb:role/bbbbbbbbbbbbb-admin"
                ]
            },
            "Action": "kms:*",
            "Resource": "*"
        },
        {
            "Sid": "Allow access for Key Administrators",
            "Effect": "Allow",
            "Principal": {
                "AWS": [
                    "arn:aws:iam::aaaaaaaaaaaa:user/username_with_admin_privileges_from_aaaaaaaaaaaa_account"
                ]
            },
            "Action": [
                "kms:Create*",
                "kms:Describe*",
                "kms:Enable*",
                "kms:List*",
                "kms:Put*",
                "kms:Update*",
                "kms:Revoke*",
                "kms:Disable*",
                "kms:Get*",
                "kms:Delete*",
                "kms:TagResource",
                "kms:UntagResource",
                "kms:ScheduleKeyDeletion",
                "kms:CancelKeyDeletion",
                "kms:ReplicateKey",
                "kms:UpdatePrimaryRegion"
            ],
            "Resource": "*"
        },
        {
            "Sid": "Allow use of the key",
            "Effect": "Allow",
            "Principal": {
                "AWS": [
                    "arn:aws:iam::aaaaaaaaaaaa:root",
                    "arn:aws:iam::aaaaaaaaaaaa:role/aaaaaaaaaaaa-admin",
                    "arn:aws:iam::aaaaaaaaaaaa:user/username_with_admin_privileges_from_aaaaaaaaaaaa_account",
                    "arn:aws:iam::bbbbbbbbbbbb:root",
                    "arn:aws:iam::bbbbbbbbbbbb:role/bbbbbbbbbbbb-admin"
                ]
            },
            "Action": [
                "kms:Encrypt",
                "kms:Decrypt",
                "kms:ReEncrypt*",
                "kms:GenerateDataKey*",
                "kms:DescribeKey"
            ],
            "Resource": "*"
        },
        {
            "Sid": "Allow attachment of persistent resources",
            "Effect": "Allow",
            "Principal": {
                "AWS": [
                    "arn:aws:iam::aaaaaaaaaaaa:root",
                    "arn:aws:iam::aaaaaaaaaaaa:role/aaaaaaaaaaaa-admin",
                    "arn:aws:iam::aaaaaaaaaaaa:user/username_with_admin_privileges_from_aaaaaaaaaaaa_account",
                    "arn:aws:iam::bbbbbbbbbbbb:root",
                    "arn:aws:iam::bbbbbbbbbbbb:role/bbbbbbbbbbbb-admin"
                ]
            },
            "Action": [
                "kms:CreateGrant",
                "kms:ListGrants",
                "kms:RevokeGrant"
            ],
            "Resource": "*",
            "Condition": {
                "Bool": {
                    "kms:GrantIsForAWSResource": "true"
                }
            }
        }
    ]
}
2.- Copy the AMI using the new customer managed encryption key
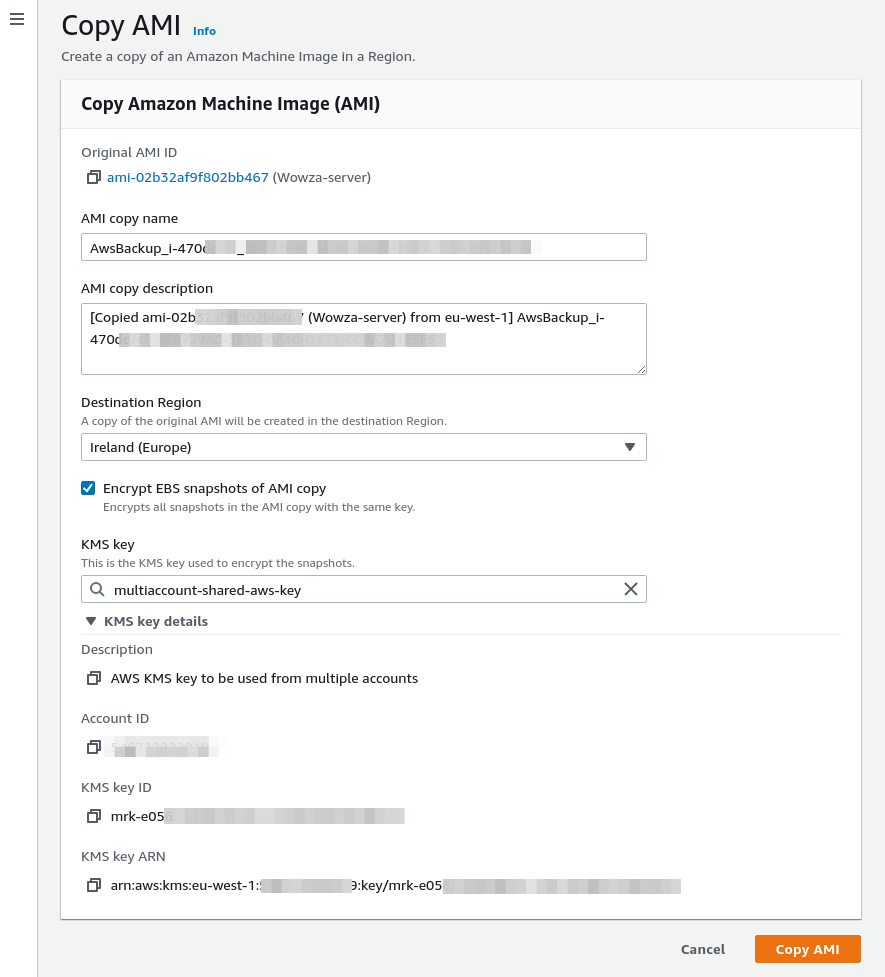
Make a copy of the AMI you want to share with the other AWS account, but this time using the new encryption key you created in the previous step. To do this, go to the AMI section of Amazon EC2 service, select the AMI you want to share, and with the right button select the “Copy AMI” option. As you can see in the following screenshot, you’ll select the multi-account-shared-aws-key KMS key you just created:
3.- Modify AMI permissions to share it with the destination account
Once copied, you’ll modify the permissions of the new AMI to add the account ID you want to share it with. Just click on the “Add account ID” button and enter the destination AWS account ID:

4.- Verify the shared AMI is visible in the destination account
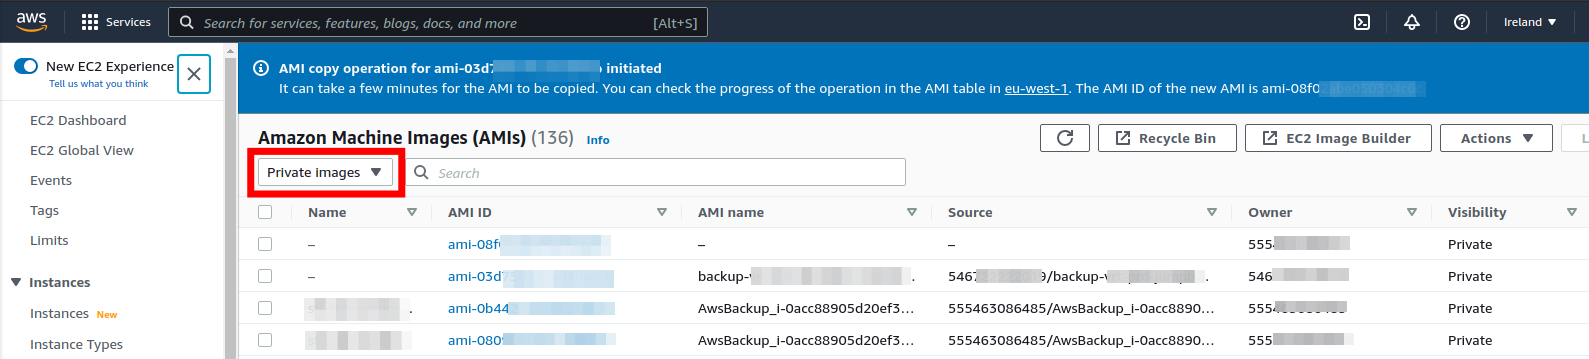
After this, if you access the destination account console, you can now see the shared AMI in the AMI list. But it’s important to select private images in the filter, otherwise it won’t show up since by default only images you own are shown. But in this case the owner is the source account.
5.- (Optional) Create a copy in the destination account
Finally, if you want to keep a copy of the AMI in the destination account encrypted with its own keys and have the destination account ID appear as the owner, you’ll make a copy of it just as you did in step 2, but this time selecting the default encryption key of the destination account or another one you have created specifically for that account. This way you’ll have full ownership and control of the AMI in the destination account.


Comments
Submit comment